
free shipping at $99


You've got the mold, the baking soda, and the citric acid lined up on the counter. Then you scoop everything into cups, add a few sprays of witch hazel, and hope the mixture will press cleanly. The first bomb crumbles, the next one swells, and the scent seems stronger in some pieces than others.
A bath bomb recipe by weight removes much of that guesswork. Once you know the finished weight your mold needs, you can calculate the fizzing base, keep fragrance within a controlled range, and scale the same formula for a gift set or a larger batch. The process is still hands-on and creative, but the kitchen scale gives every decision a dependable starting point.
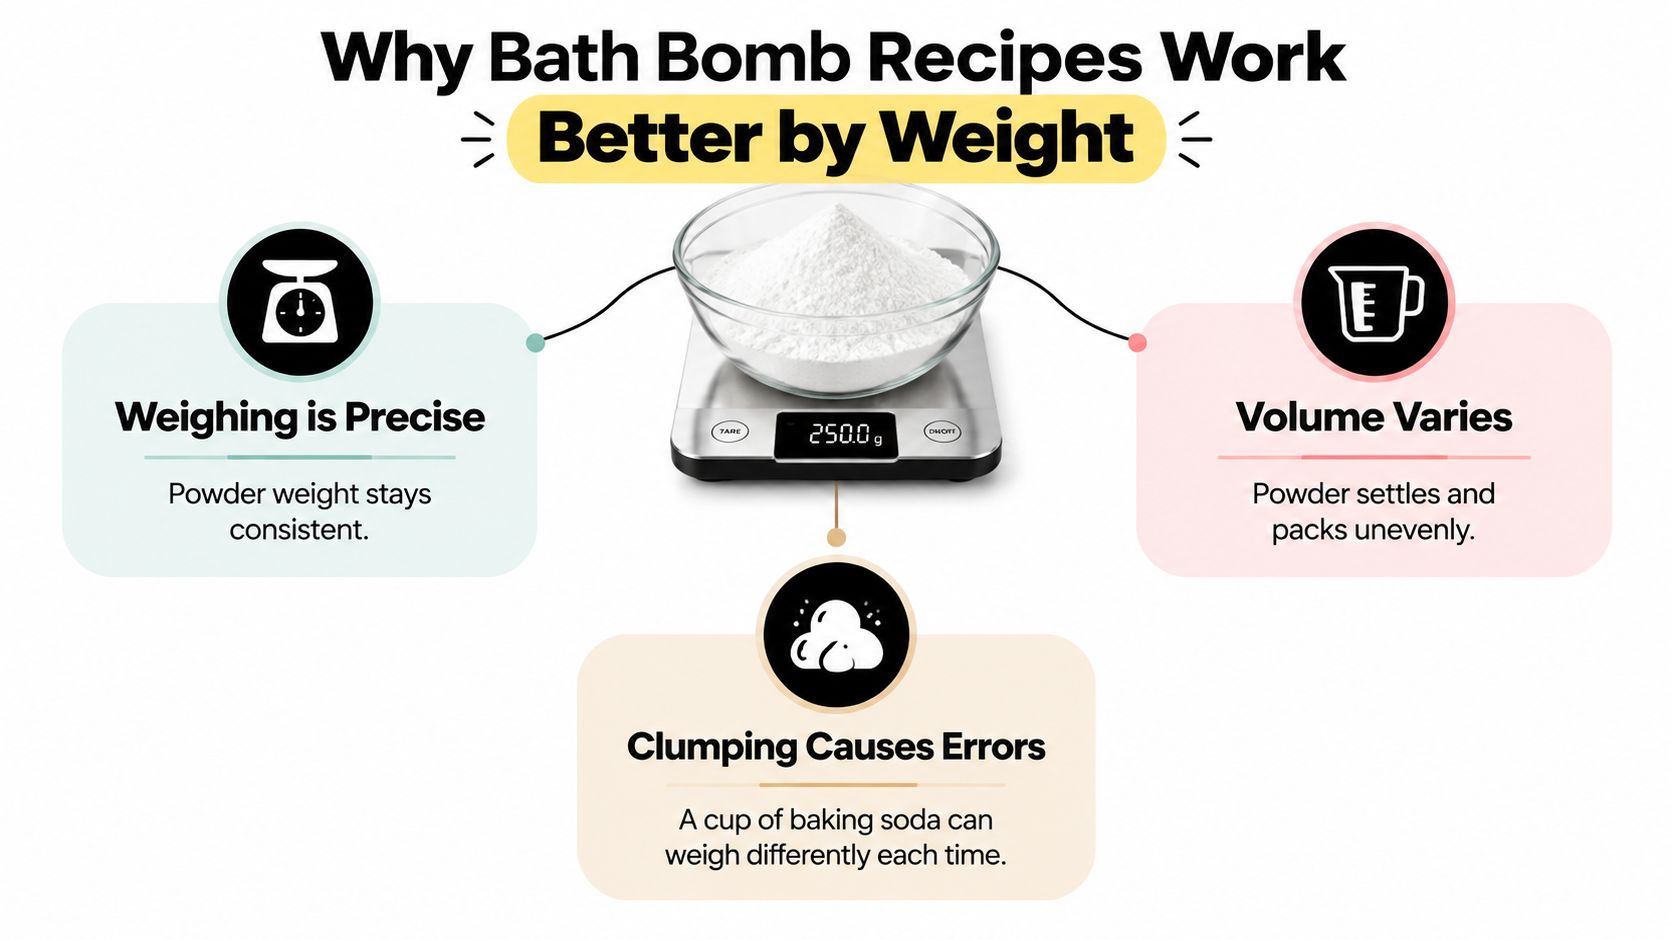
Set a digital kitchen scale on the counter, place your mixing bowl on top, and press tare until the display returns to zero. You can then weigh each ingredient directly and record what went into the batch. That small habit is more reliable than filling a cup, because powders settle, clump, and pack differently depending on how you scoop them.
A weight-based formula measures the actual amount of material. A volume measure only tells you how much space the powder occupies. That difference affects the balance between the two ingredients responsible for the fizz, as well as the texture that lets the finished bomb hold together.
Baking soda, or sodium bicarbonate, is the alkaline side of the reaction. Citric acid supplies the acidic side. Once both ingredients dissolve in bath water, the acid-base reaction releases carbon dioxide, which creates the familiar bubbling and effervescence.
A widely used starting point is a 2:1 ratio of baking soda to citric acid by weight, such as 200 g of baking soda with 100 g of citric acid or 250 g with 100 g. The chemistry-oriented guidance from Bath Fizz and Foam's basic bath bomb recipe describes the formulation as approximately 2:1 and notes that a slightly different 2.25:1 ratio can still be practical.
That ratio is an anchor, not a complete recipe. Starch, salt, oil, fragrance, color, and a carefully controlled activator all change how the mix behaves. Weighing lets you add those supporting ingredients without shifting the core balance.
Practical rule: Write every formula as grams first. Cups can be useful for rough kitchen experiments, but grams make it possible to repeat the same fizz, firmness, and moldability.
The same principle helps with other homemade bath products. If you're experimenting beyond fizzing bombs, natural bath salt recipes from Skin Perfection offer useful inspiration for weighing and combining bath ingredients. For a plain-language explanation of the reaction itself, see how bath bombs work.
A dependable bath bomb has several jobs to perform at once. The baking soda and citric acid create the reaction, oil helps the powder bind, a small amount of liquid activator brings the mix to moldable dampness, fragrance gives it character, and color creates the visual finish.
Percentage bands make scaling easier because they describe each ingredient in relation to the total finished mix. One formulation guide places baking soda at 40% to 50%, citric acid at 20% to 25%, cornstarch at 10% to 15%, Epsom salt at 5% to 10%, carrier oil at 5% to 10%, and fragrance oil at 1% to 3% of the total mix. Those ranges are summarized in Crafting Supply's bath bomb formulation guide.
The table below adapts the practical role-based structure to a 120 g packed mold fill. Treat it as a starting formula, then test the exact ingredients and mold you use.
| Ingredient Role | Example Ingredient | Weight Percent | Grams in 120 g Bomb |
|---|---|---|---|
| Fizzing base | Baking soda | 40% to 50% | 48 g to 60 g |
| Fizzing acid | Citric acid | 20% to 25% | 24 g to 30 g |
| Texture support | Cornstarch | 10% to 15% | 12 g to 18 g |
| Hardness and feel | Epsom salt | 5% to 10% | 6 g to 12 g |
| Binder | Carrier oil | 5% to 10% | 6 g to 12 g |
| Scent | Skin-safe fragrance oil | 1% to 3% | 1.2 g to 3.6 g |
Those bands don't need to be used at their maximum values all at once. A recipe calculator from UseCalcPro presents the fizzing base as roughly 85% of the total mix, with the remaining weight divided among cornstarch, carrier oil, Epsom salt, and fragrance. That approach can produce a firmer, more fizz-focused bomb than a formula carrying heavier amounts of texture ingredients.
For a 120 g mold, start by deciding whether the mold holds 120 g of packed mix. Fill it with your dry base, press firmly, and weigh the contents. Mold capacity is the number that makes scaling useful. Once you've confirmed it, calculate every additive from that target rather than guessing by spoon.
If you handle large amounts of powder, use sensible ventilation and avoid breathing airborne dust. The equipment principles described in this overview of a fume hood for pharmaceutical labs are designed for professional environments, but the basic lesson still applies at home: weigh carefully, keep powders contained, and clean the work surface afterward.
The order of operations matters more than fancy equipment. Prepare every ingredient before combining anything wet with the fizzing base, because citric acid can begin reacting as soon as unwanted moisture enters the bowl.
Dry color needs thorough mixing. If you rush this step, one bomb may carry a dark pocket while another looks washed out. A fine sieve can help with powdery colorants, but don't force damp material through it.
In a separate cup, weigh the carrier oil and fragrance oil. If you're using an oil-soluble color, blend it into this wet portion. Pour slowly rather than tipping everything into one spot.
Drizzle the wet mixture over the dry ingredients while tossing continuously with gloved hands or a whisk. The goal is a texture like slightly damp sand. It should feel cohesive enough to pack, but it shouldn't look glossy, wet, or active.
Use the handful test:
Water-based activators need restraint. A controlled mist is easier to manage than pouring liquid into the bowl, because excess moisture can start the reaction before the bomb has been compressed.
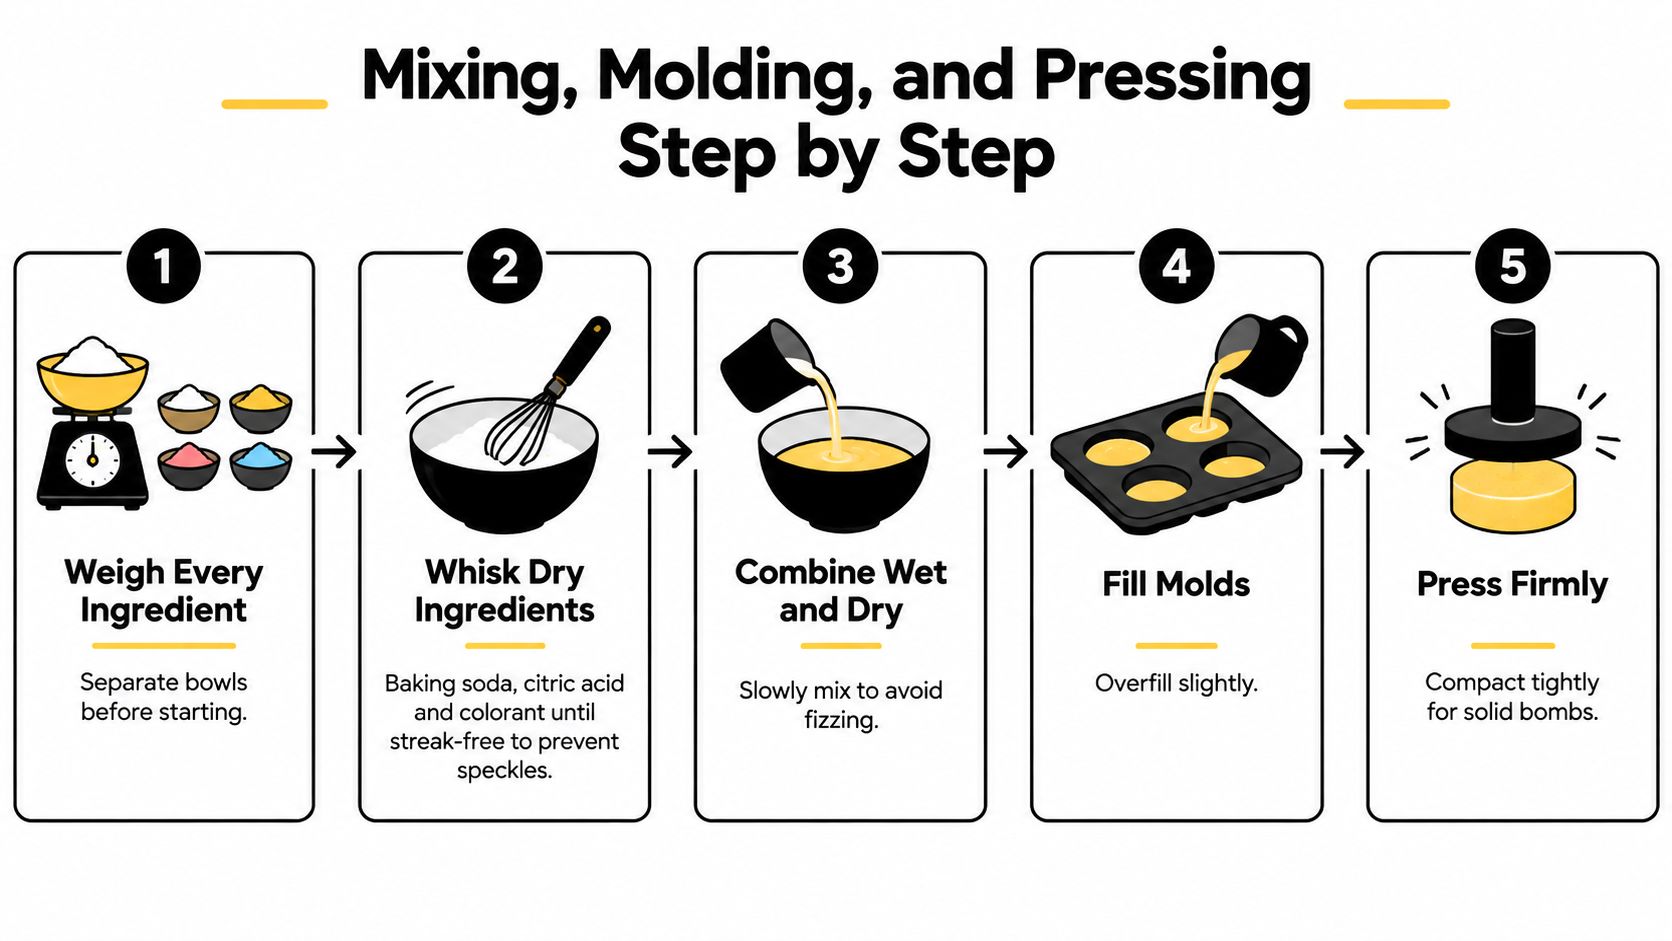
Pack both mold halves firmly. Slightly overfill each side, place the halves together, and press with steady pressure. A strong press compacts the mix and reduces weak spots around the seam.
Twist the halves apart gently if the mold allows it. Turn the bomb onto a soft towel rather than a hard counter, then leave it undisturbed while the surface firms. Don't carry freshly unmolded bombs by pinching the sides, because that pressure can create hairline cracks.
For another variation using a familiar kitchen ingredient, compare the technique with bath bombs made with cream of tartar.
This short demonstration can help you see the hand pressure and mold movement in practice:
Fragrance, color, and surprises should be planned as part of the formula, not added at the end by instinct. A scent that works beautifully in a candle may be unsuitable for skin, and a color that looks soft in dry powder can become intense once the bath bomb dissolves.
For skin-contact products, choose a fragrance specifically labeled for bath and body use. A practical fragrance range is 1% to 3% of the total mix, as outlined in Craftovator's bath bomb guidance. The same source gives a clear example: a 50 g finished bomb should contain no more than 1.5 g fragrance oil when using the 3% ceiling.
Start with one fragrance while you're learning how your base behaves. Once the texture is repeatable, blend complementary notes and keep the combined total within the same overall fragrance limit.
Essential oils need their own safety review. Their appropriate use level can vary by oil, supplier guidance, and intended product, so don't assume that an essential oil can be substituted gram for gram for a fragrance oil. Always follow the supplier's skin-use documentation.
Cosmetic-grade mica is useful for a pearly appearance, while water-soluble colorants or suitable cosmetic lakes disperse differently in the bath. Test a small bomb in a light-colored container before committing to a large batch, especially when using deep shades.
Polysorbate 80 is often used to help disperse oils and reduce the chance of a greasy ring or color sticking to the tub. If you include it, count it as part of the total formula rather than treating it as free liquid.
A hidden ring or charm changes the mold process. Weigh the object, wrap it completely in a dry baking soda paste, and place it deep inside one hemisphere. The covering should prevent sharp edges from reaching the surface, and the object should be centered before pressing the halves together.
The final presentation can reinforce the surprise without adding more formula complications. For gift tags, wrapping, and display ideas, these presentation tips from taap.bio are a useful companion to the making process. You can also browse ideas for scents for bath bombs before choosing a finished blend.
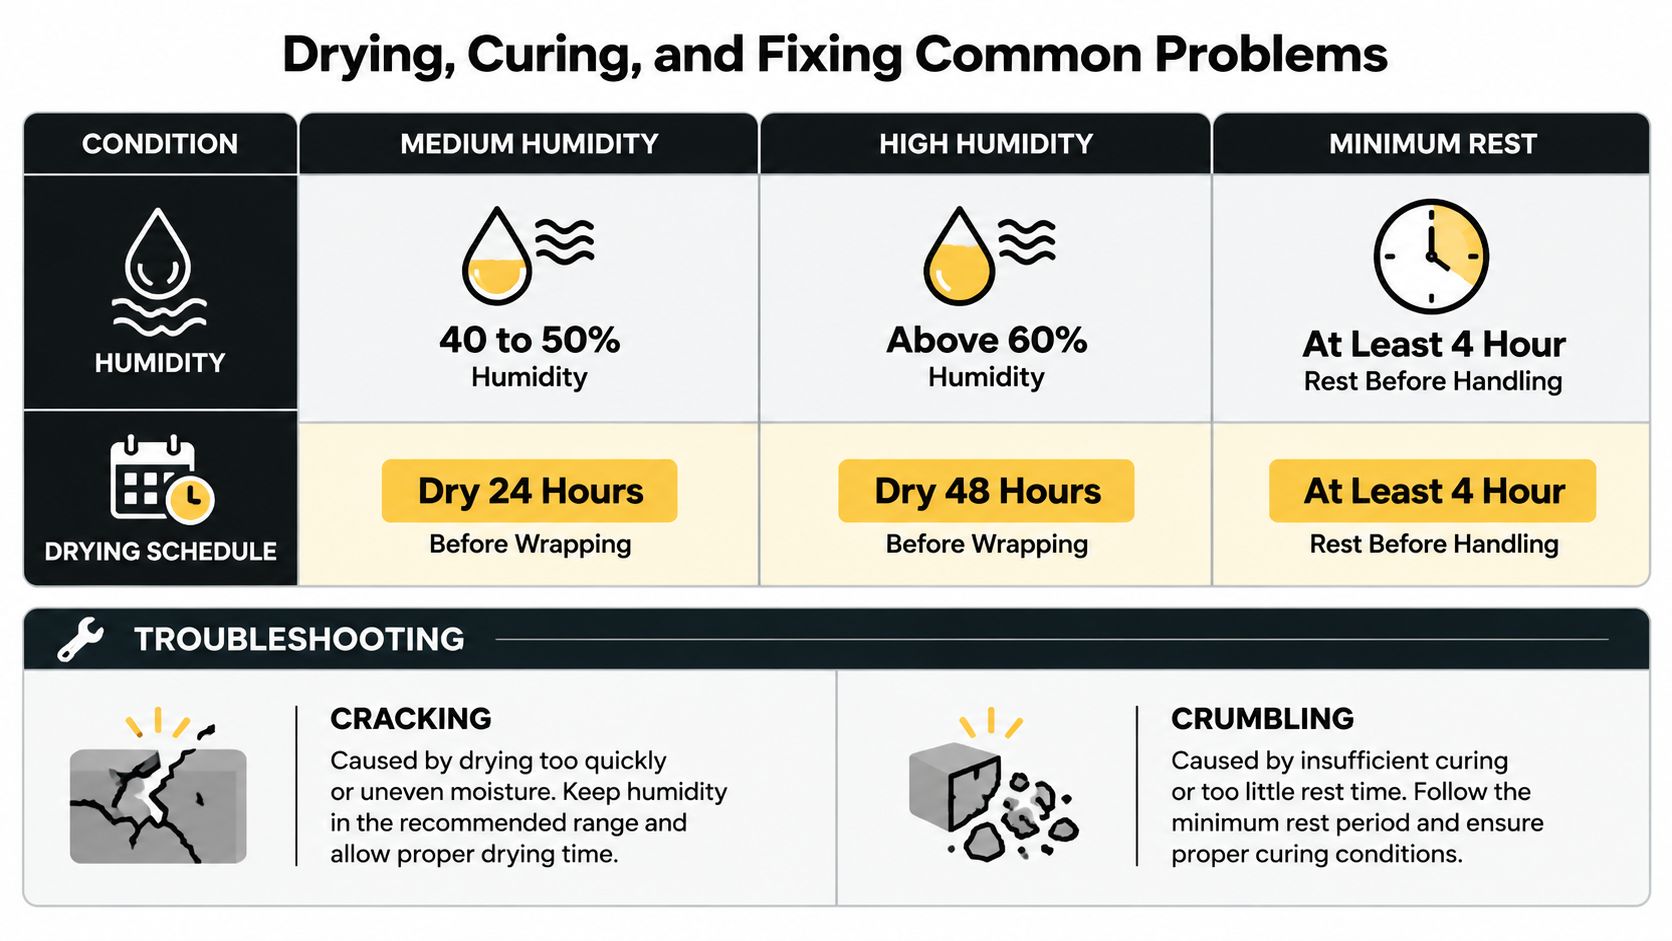
A bath bomb may feel firm soon after molding and still contain enough moisture to soften, crack, or react during storage. Drying time depends on the room, the mold, and how much liquid the mix received, so use humidity as a guide rather than relying only on touch.
At 40% to 50% relative humidity, allow 24 hours before wrapping. Above 60% humidity, allow 48 hours. If you're using a harder mold, give the bomb at least 4 hours of rest before unmolding, particularly in a very dry room below 30% humidity. These working targets come from the supplied curing guidance and should be treated as a starting schedule, not a guarantee for every formula.
| Symptom | Likely Cause | Weight-Based Adjustment |
|---|---|---|
| Cracks on top | Mix is too dry or under-bound | Add 0.5 g witch hazel per 100 g of mix in the next test |
| Expansion or flat tops | Too much liquid or early reaction | Reduce binder by 0.3 g in the next test |
| Weak fizz | Core ratio has drifted toward excess baking soda | Reweigh the base and rebatch at the intended ratio |
| Crumbling edges | Insufficient compaction or moisture | Add activator gradually and press more firmly |
| Pitting | Wet ingredients were added too quickly | Drizzle more slowly and mix continuously |
| Color bleed | Too much colorant or poor dispersion | Reduce the colorant and preblend it thoroughly |
The correction should be small and recorded. Don't change the acid ratio, oil, fragrance, and spray amount in the same test, because you won't know which adjustment solved the problem.
Controlled testing has shown how sensitive fizz speed can be to ratio changes. One project found a fastest response near a 1:0.78 citric-acid-to-baking-soda ratio, with an average fizz time of 3.7 seconds, as reported in the USC project PDF. The result isn't a universal target for every bath bomb, but it demonstrates why consistent weighing matters when you're comparing batches.
Keep a batch log: Record ingredient weights, room humidity, mold capacity, and the exact correction. A short note is more useful than trying to remember what “a little more witch hazel” meant.
Start with one packed mold cavity. If it holds 120 g, a dozen bombs needs approximately 1,440 g of finished mix, based on the batch-sizing guidance from Calculator Cloud. For a different mold, fill one cavity with your tested mixture, weigh it, and multiply that weight by the number of bombs required. The mold sets the target. The recipe supplies the percentages.
Once you know the target weight, divide it by the weight of your tested batch. That result is your multiplier. For a 240 g recipe, the common batch sizes work like this:
| Target Batch | Multiplier from a 240 g Recipe | What to Do |
|---|---|---|
| 240 g | 1 | Use the tested recipe as written |
| 1 kg | 4.17 | Multiply every ingredient by 4.17 |
| 5 kg | 20.83 | Multiply every ingredient by 20.83 |
| 10 kg | 41.67 | Multiply every ingredient by 41.67 |
Apply the multiplier to every ingredient, including the 2:1 baking soda-to-citric-acid base, fragrance, oil, colorant, and activator. If fragrance is 2% in the test batch, keep it at 2% as production increases. Do not exceed the 3% fragrance ceiling, keep colorant within the working limit of 1%, and keep polysorbate 80 at or below 1%.
A larger batch needs an equally clear mixing plan. If the bowl cannot hold the full amount evenly, weigh the dry ingredients into manageable portions. Mix each portion thoroughly, then combine them and check the color and texture before adding activator. This prevents one part of the batch from becoming wetter or more strongly colored than another.
Fully dry the bombs before wrapping them in airtight cellophane or shrink wrap, and protect the finished stock from humidity. For a surprise-style product made at a 20 g bomb size, include the embedded item and packaging in the design calculation so the shell remains safe to handle and the item stays enclosed.
Keep the scale beside the bowl. For finished bath products and surprise jewelry formats, Jackpot Candles shows how a bath bomb can combine fragrance, presentation, and a hidden jewelry piece.
Choose one mold, weigh its packed capacity, and test the 2:1 baking soda-to-citric-acid starting ratio before multiplying the batch. Record every gram and the room humidity. Once the small batch behaves consistently, scale the same percentages to any mold size or production count.
Comments will be approved before showing up.