free shipping at $99


That moment of horror when a candle tips over is all too familiar. But before you grab a cloth and start scrubbing, take a deep breath and step back. The single most important thing you can do is let the wax cool and harden completely.
Seriously, just walk away for a bit. Trying to wipe up hot, liquid wax will only smear it deeper into the surface, turning a simple mishap into a much bigger headache. Patience is your best friend here.
Once the wax is solid, you can start to figure out your game plan. How you tackle this mess depends entirely on two things:
Most candles you'll find are made from paraffin, soy, or beeswax. Paraffin wax makes up about 70% of candles sold worldwide and typically melts between 46 to 68°C (115 to 154°F). Soy wax, which you'll see in about 20% of candles, has a lower melting point. Then there's beeswax, which melts at a higher 62 to 64°C (144 to 147°F) and is notoriously sticky, making it a bit tougher to deal with. If you're curious, you can explore more about wax market trends to see how these types differ.
With the surface and wax type in mind, you can pick your strategy. A huge mistake I see people make is trying a one-size-fits-all solution, like blasting a delicate fabric with a hairdryer.
Key Takeaway: The golden rule is to match your removal method to the material. Using an aggressive technique on a delicate surface is a recipe for disaster.
To help you decide, here’s a quick reference guide before you get started.
Consult this quick plan before you start. It outlines the best method based on the surface type, helping you avoid accidental damage.
| Surface Type | Primary Method | Key Precaution |
|---|---|---|
| Fabrics (Cotton, Denim) | Heat (Iron) | Use a cloth barrier; avoid direct contact. |
| Delicate Fabrics (Silk, Velvet) | Cold (Freezing) | Don't scrape too aggressively. |
| Wood (Finished) | Heat (Hairdryer) | Keep the dryer moving to avoid scorching. |
| Carpet | Heat (Iron) | Blot, don't rub, to lift the wax. |
| Hard Surfaces (Glass, Metal) | Cold (Ice) | Scrape gently with a plastic tool. |
| Porous Surfaces (Concrete) | Poultice/Solvent | Test in an inconspicuous spot first. |
This plan gives you a solid starting point and helps prevent those "oops" moments that can ruin your favorite things.
This decision tree gives you a visual on whether to use heat or cold.
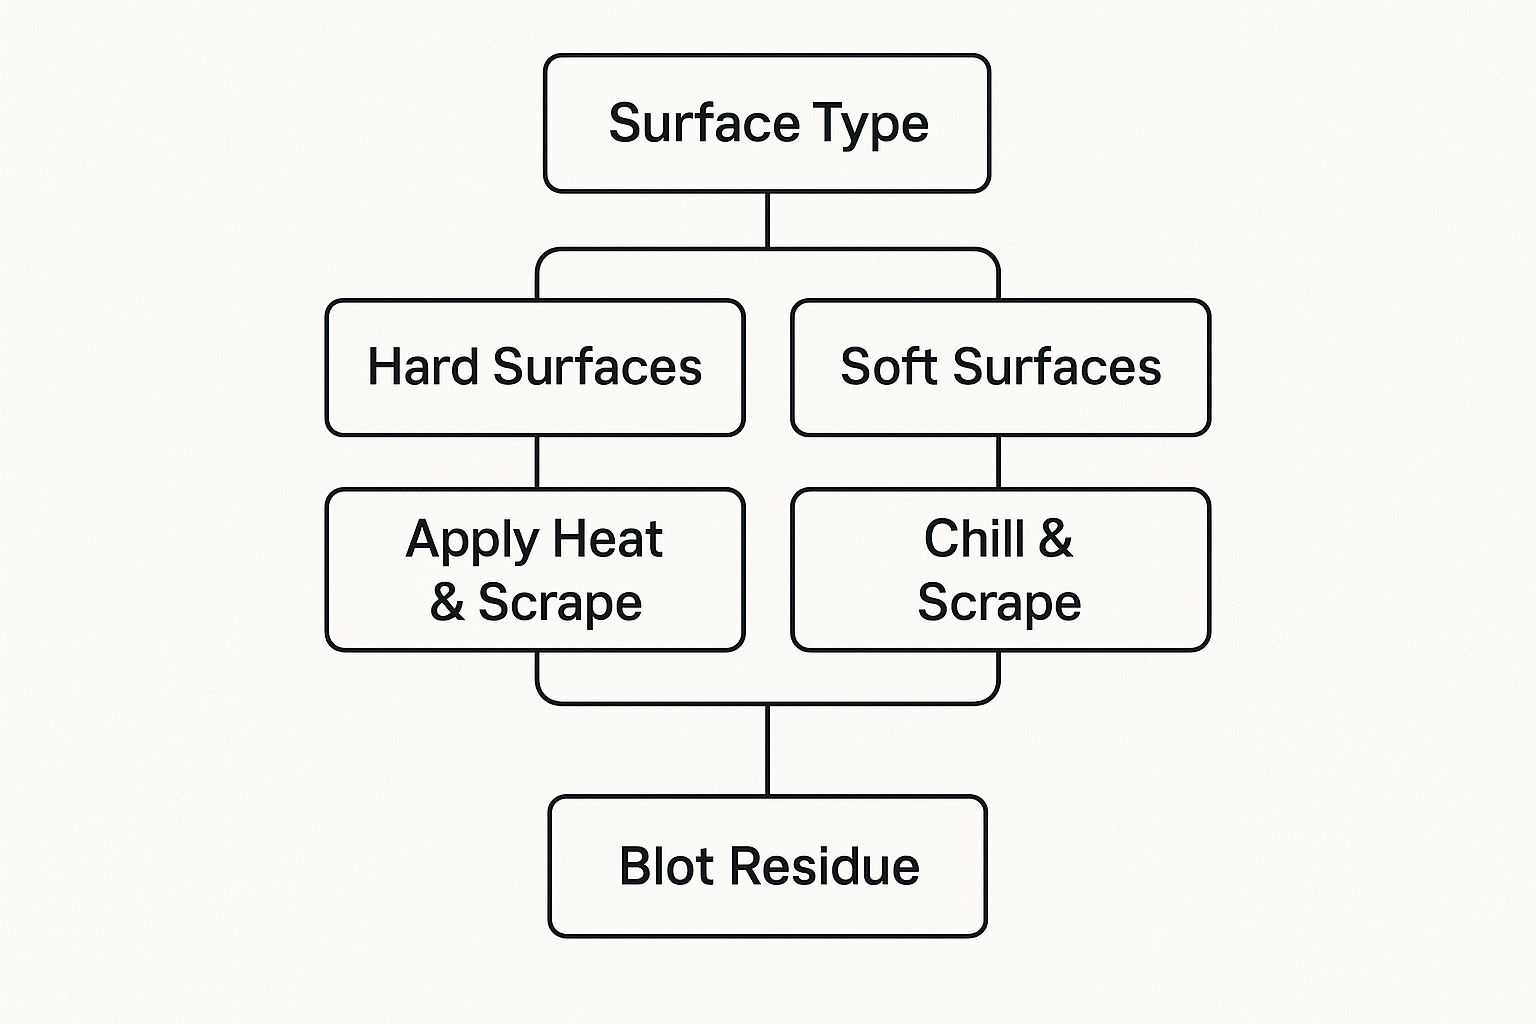
As you can see, hard, non-porous surfaces generally do well with a bit of heat to soften the wax for removal. On the other hand, soft surfaces like fabric and carpet often benefit from chilling the wax first. This makes it brittle, so you can just break it off.
A drip of candle wax on your favorite sweater or a rogue patch on the living room rug feels like a disaster. We've all been there. But before you panic, know that with a little patience and a common household appliance, it's usually completely reversible.
The secret is using heat to transfer the wax out of the fabric fibers and into something absorbent. Once you've gently scraped away the big, hardened chunks (a butter knife or the edge of a credit card works great), you're ready for the main event.
Grab your iron and either a few paper towels or a plain brown paper bag. This method has been a lifesaver for decades for one simple reason—it just works. Believe it or not, this iron-and-paper trick can remove up to 90% of wax from fabric, which is a huge improvement over just scraping.
First things first, place a paper towel or a piece of the brown paper bag right over the wax stain. If you're working on clothes, it's a good idea to slip another paper towel inside the garment. This stops the melted wax from seeping through to the other side.
Set your iron to a low, no-steam setting. High heat is a no-go; you could scorch the fabric or even melt carpet fibers, creating a much worse problem.
Gently press the warm iron onto the paper towel for just a few seconds. You'll literally see the wax melt and soak into the paper, creating a greasy-looking spot. Lift the iron, shift to a clean section of the paper, and press again. Keep doing this, moving to a fresh spot each time, until the paper stops pulling up any more wax.
Pro Tip: Keep the iron moving in a slow, constant motion. Letting it sit in one place for too long is how you accidentally overheat the fibers, especially with synthetic carpets or delicate fabrics.
After the solid wax is gone, you might still see a faint, oily stain or a hint of color left behind. This is totally normal, especially if you were burning a brightly colored candle. How you tackle this little remnant depends on the surface.
For washable fabrics:
For carpets:
Of course, preventing spills is always the best strategy. To learn how to get a perfect, even burn that minimizes drips, check out our guide on how to prevent and fix candle tunneling.
When candle wax decides to drip onto a hard surface like wood, glass, or tile, you have to completely switch gears from the blotting and absorbing methods we use on fabrics. The game here is all about temperature—making the wax either soft enough to wipe away or brittle enough to flick off, without hurting the surface underneath.
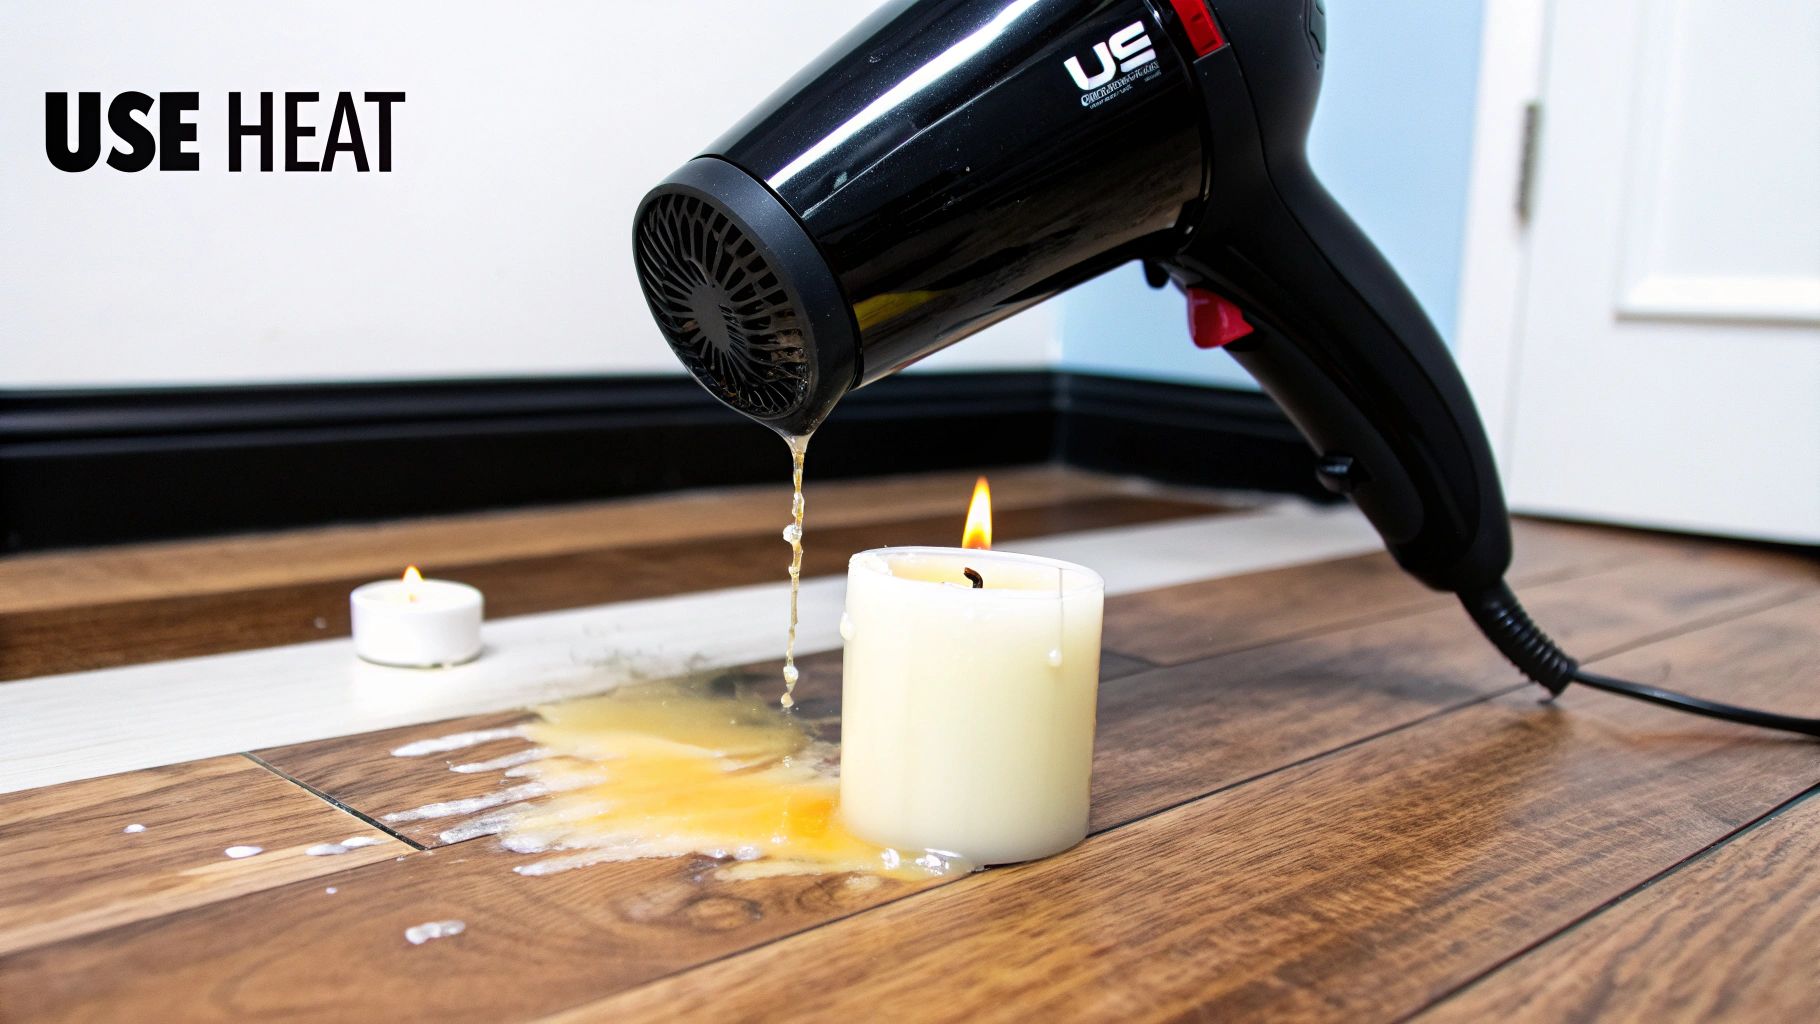
Let's say a big glob of wax has hardened on your beautiful dining room table. Your first thought might be to just scrape it off, but that's a recipe for a permanent scratch. A much better way involves a little gentle heat.
This is where your hairdryer becomes your secret weapon. Grab it, set it to medium heat, and hold it a few inches from the spill. Keep it moving so you don't accidentally overheat one spot and damage the wood's finish. It usually takes less than a minute for the wax to soften up.
Once it's soft, you can easily wipe it away with a clean, soft cloth. You might see a faint oily spot left behind, but a quick buff with some furniture polish will bring back the shine like it never even happened.
Pro Tip: Whatever you do, never use an iron on finished wood. That direct, intense heat can wreck the varnish or sealant for good, leaving you with a much bigger headache than a simple wax spill.
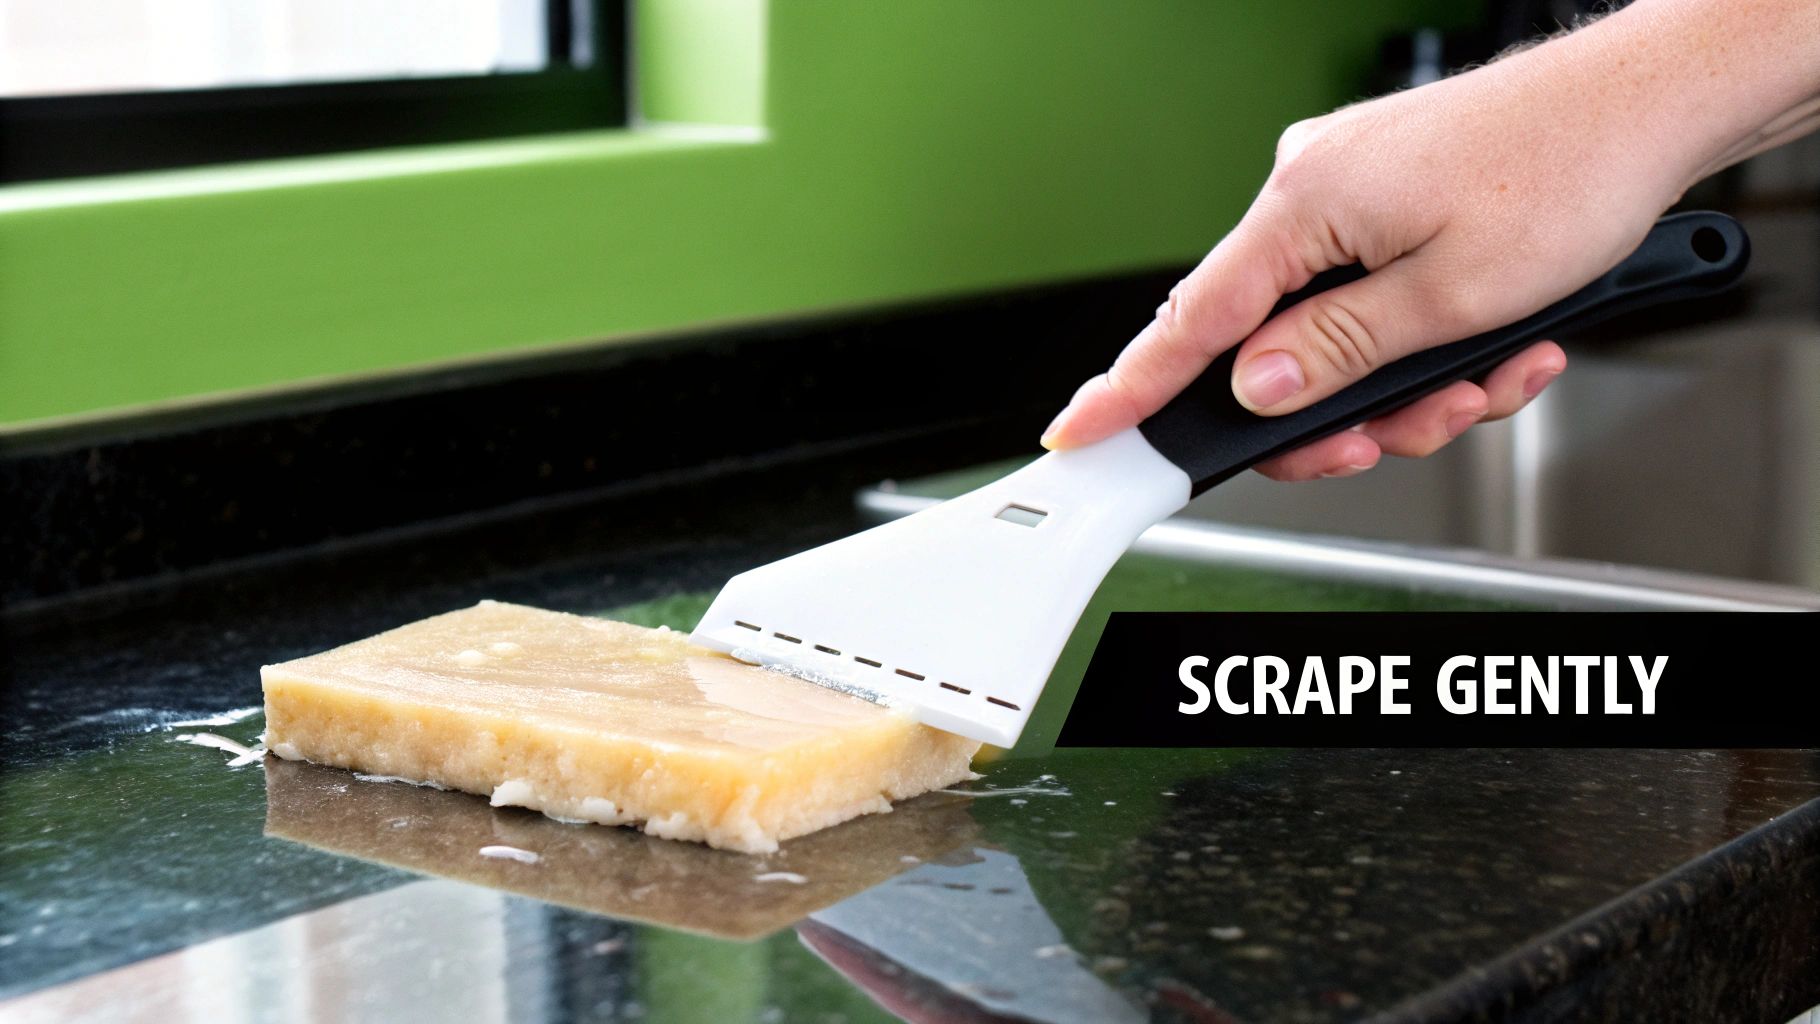
Now, for tough, non-porous surfaces like glass, metal, or ceramic tile, we're going to do the complete opposite. Forget heat—we're going to freeze it. Just place an ice pack or a baggie of ice cubes right on top of the wax for about 10-15 minutes.
This blast of cold makes the wax super brittle. Once it's completely frozen solid, you can usually pop the whole chunk off with a plastic scraper, an old credit card, or even your fingernail. The main thing is to avoid anything metal that could leave a scratch. This trick works like a charm on a glass coffee table or a tiled floor.
For a deeper dive into handling all sorts of wax mishaps, Jackpot Candles has a fantastic guide on how you can clean up spilt candle wax.
It's one thing when wax spills on a sturdy wood floor or cotton tablecloth, but what about when it drips onto your prized leather armchair, a velvet pillow, or even a painted wall? These situations call for a completely different playbook. Going in with aggressive scraping or high heat is a recipe for disaster.
Think about it: a hot iron will scorch or melt delicate fibers like silk or velvet in a heartbeat. And leather? The wrong approach can leave it looking dry, cracked, and permanently damaged. You have to adapt your technique to the surface.
With leather, it's all about finding that perfect balance of warmth. You need just enough heat to soften the wax so it becomes pliable, but not so much that you harm the leather itself.
Your best bet is a hairdryer on its lowest heat setting. Hold it several inches away from the surface to gently warm the spill. Once the wax softens up, you can usually peel most of it off. For any oily residue left behind, grab a dedicated leather cleaner and conditioner. This will lift the stain and, just as importantly, restore moisture to the material.
Suede is a whole different ballgame. Heat is a no-go here. Instead, pop the item in the freezer to make the wax hard and brittle. Once it's frozen solid, you can often gently crumble it right off.
Expert Tip: I can't stress this enough: always test your cleaning method on a hidden spot first. The inside of a seam or the underside of a cushion is perfect. A quick test can save you from a major, irreversible mistake.
That hairdryer trick comes in handy for painted walls, too. Again, use gentle, low heat to soften the wax until you can wipe it away with a soft cloth. To get rid of that faint oily sheen that wax sometimes leaves, just wipe the spot with a cloth dampened with a little water and a single drop of dish soap.
Upholstered furniture can be especially challenging since fabrics vary so much. If you're dealing with a particularly sensitive piece, you might want to look into specific guides for easy candle wax removal from your sofa. As a general rule of thumb, always start with the least aggressive method possible—like the freezing technique—before you even think about trying gentle heat.
So, you’ve managed to lift the solid wax away. Great! But sometimes, a ghostly reminder of the spill gets left behind—either a faint oily patch or a hint of color. This is a super common final hurdle, but don't worry, you can clear it with the right approach.
The secret is to treat the type of stain you're looking at. Did a vibrant red candle leave a dye mark, or did a white one leave a subtle greasy spot? Each one calls for a slightly different solution to completely erase the evidence.
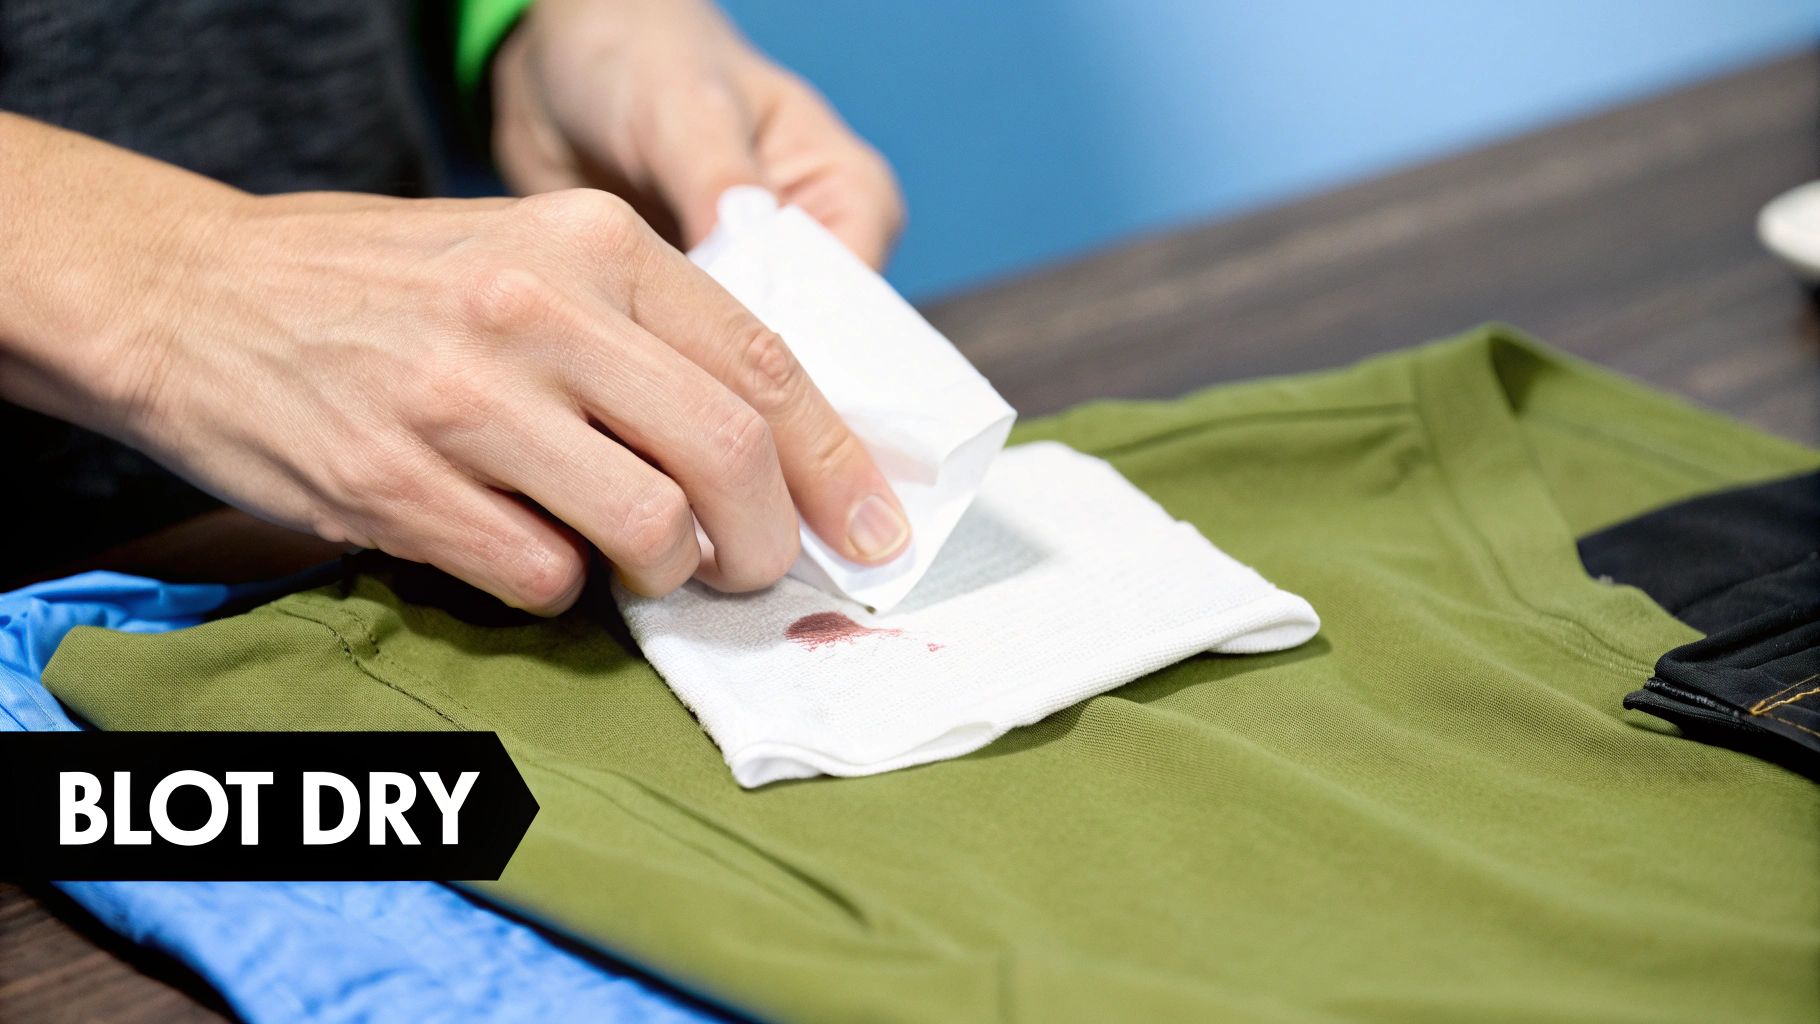
For that classic oily mark on washable fabrics, like your favorite cotton t-shirt, baking soda is your best friend. It’s gentle and fantastic at absorbing oil. Just mix up a paste of baking soda and a little water, and gently rub it into the stain. Let it sit for about 30 minutes to pull the oil from the fibers, then toss it in the wash like you normally would.
If you’re working with upholstery or carpet where laundering isn't an option, cornstarch or even talcum powder work wonders. Sprinkle a generous amount over the oily area, give it a few hours to soak up the grease, and then vacuum it all up. You might need to do this a couple of times for more stubborn spots.
Key Takeaway: The goal here is to absorb as much oil as possible before you add any liquid cleaners. Start by blotting with a clean, dry cloth, then use an absorbent powder to lift the grease right out of the fibers.
When you're dealing with colorful stains, you need something that can break down the pigment without accidentally bleaching your fabric. For carpets and upholstery, a simple mix of white vinegar and water is often all it takes.
For tougher dye stains on clothing, rubbing alcohol can be a powerful spot treatment. Just make sure to test it on a hidden spot first—like an inside seam—to make sure it’s safe for the fabric.
And hey, if you’re trying to clean wax out of the candle jar itself, check out our guide on how to remove wax from an empty candle jar. It has some great tips that help prevent these messy secondary stains from happening in the first place.
Even when you know the basics, sometimes a wax spill throws you a curveball. Let's tackle some of those tricky situations and specific questions that pop up when you're dealing with a candle wax mess.
Absolutely. A hairdryer is a fantastic alternative for getting wax out of carpets, and I often prefer it. It’s especially useful for smaller spills or if you have a more delicate carpet pile, since it gives you much better control over the heat.
Just set your hairdryer to a medium heat setting and hold it a few inches away from the wax. The moment you see it start to melt, start blotting with a clean white cloth or a few paper towels. A key tip here is to always work from the outside edges of the spill inward—this keeps you from accidentally making the spot bigger.
Dealing with colored wax is always a two-step dance. First, you have to get rid of the physical wax itself. Use whatever method is best for the surface you’re working on, whether that’s heat, ice, or a gentle scrape. But once the wax is gone, you’ll almost always be left with a colorful dye stain.
If you’re working with washable fabrics, grab a laundry pre-treatment stain remover. Apply it right on the spot and let it work its magic for about 15 minutes before tossing it in the wash. For carpets or upholstery, a simple solution of one part white vinegar to two parts water usually does the trick.
There are two great ways to clean out old candle jars so you can give them a second life. The most important rule? Never, ever pour melted wax down your drain. It will harden in your pipes and create a plumbing nightmare.
The freezing method is probably the cleanest and easiest. Just pop the candle jar in your freezer for a few hours. The cold makes the wax shrink and harden, and it will often pop right out in one solid piece.
Expert Tip: If you have a few stubborn bits of wax left after freezing, a quick wipe with a paper towel and some warm, soapy water will take care of them. This gets the jar perfectly clean and ready to be a new planter, pencil holder, or whatever you can dream up.
Your other option is the hot water method. Carefully pour very hot—but not boiling—water into the jar, leaving a little space at the top. The heat melts the wax, which then floats to the surface. Just let the water cool down completely, and the wax will harden into a neat little disc that you can lift right out.
For a comprehensive collection of articles on maintaining a clean home, you may want to explore some additional cleaning tips and resources.
At Jackpot Candles, we believe every candle should be a delightful experience from the first light to the very last flicker. Discover our collection of beautiful, clean-burning soy candles, each with a surprise piece of jewelry hidden inside. Find your next favorite scent and treasure at https://www.jackpotcandles.com.
Comments will be approved before showing up.