free shipping at $99


Taking proper care of your wooden wick candle is about so much more than just lighting it and blowing it out. It's a simple routine, really: trim the wick, get a full melt pool on that crucial first burn, and then just be consistent. Getting this right is what unlocks a cleaner, longer-lasting, and far more enjoyable experience from your candle.
If you've ever lit a wooden wick candle, you already know it’s a whole different vibe from a standard cotton wick. It’s not just about the light; it’s about the entire sensory atmosphere it creates in a room.
The first thing everyone notices is that signature crackle. It's a gentle, soothing sound that immediately makes any space feel cozier, like you've got a tiny fireplace right there with you. That unique sound is a huge part of their charm and a key reason so many of us are converts.
But the magic goes beyond just the sound. Wooden wicks burn in a completely different way. They produce a wider, lower flame that's fantastic for melting the wax evenly all the way across the surface. This is a game-changer for preventing that annoying "tunneling," where a ring of hard wax gets left behind on the sides of the jar.
There's also a growing appreciation for the sustainability of wooden wicks. Many people are drawn to their eco-friendly profile, especially when you find them paired with natural waxes like soy or coconut. This combination of a unique sensory experience and mindful consumerism is a big driver behind their recent surge in popularity, as more of us look for sustainable ways to scent our homes.
If you’re wondering why they’ve become such a staple in the home fragrance world, it’s this perfect blend of cozy aesthetics and eco-friendly design.
At its core, proper wooden wick candle care isn't a chore. It's a mindful practice that honors the craftsmanship of the candle, enhances its performance, and extends its life.
Because of their unique design, a specific care routine is pretty much non-negotiable. A cotton wick might forgive you if you forget to trim it, but a wooden wick won't be so kind.
If the wick is too long, you'll get smoke and soot, which nobody wants. If it's too short, it might struggle to stay lit or even get "drowned" by the melted wax. Mastering just a few simple techniques is the key to unlocking their full potential and avoiding these common issues.
To see these techniques in action, you can check out our complete guide on how to perfectly burn your wood wick candle. Once you understand what makes them special, you can make sure every single burn is as perfect as the first.
It can be helpful to see the differences side-by-side. While both types of wicks will light up your candle, their performance and care needs are worlds apart.
Here’s a quick breakdown:
| Feature | Wooden Wick | Cotton Wick |
|---|---|---|
| Sound | Gentle, soothing crackle | Silent |
| Flame | Wide, horizontal flame | Tall, teardrop-shaped flame |
| Melt Pool | Promotes an even melt, prevents tunneling | Prone to tunneling if not burned long enough |
| Trimming | Crucial. Must be trimmed to 1/8 inch | Important. Trim to 1/4 inch |
| Maintenance | Requires removing charred bits before relighting | Simpler; just needs a quick snip |
| Vibe | Cozy, rustic, fireplace-like | Classic, traditional |
Ultimately, choosing between a wooden and cotton wick comes down to the experience you're looking for. If you love that cozy, crackling sound and a modern aesthetic, a wooden wick is probably for you—as long as you’re up for a little extra TLC.
If you take away just one thing about caring for your wooden wick candle, let it be this: the first time you light it is the most important burn it will ever have. No exaggeration. This initial session literally sets the "memory" for every burn that follows.
Getting this right is the secret to a long, happy life for your candle. Getting it wrong is how you end up with those frustrating issues that can ruin the whole experience.
The main goal here is simple: achieve a full melt pool. This just means letting the melted wax spread all the way to the edges of the container. If you get impatient and blow it out too soon, you’re setting your candle up for failure by creating a "tunnel."
We’ve all seen it. Tunneling is that stubborn ring of hard, unmelted wax that clings to the sides of the jar, refusing to melt no matter what you do. Once a tunnel forms, the wick has no choice but to burn straight down the middle, wasting tons of wax and, with it, all that beautiful fragrance.
The fix is all about prevention. You have to let that first burn go long enough.
A fantastic rule of thumb is to allow one hour of burn time for every inch of the container’s diameter. For most of the candles you'll have, this usually means letting it burn for about 2 to 4 hours. Just set a timer and let it do its thing.
Pro Tip: Never let any candle burn for more than four hours at a time. This keeps the jar from getting dangerously hot and stops the wick from becoming unstable in a deep pool of liquid wax.
The visual cue couldn't be easier. Just peek at your candle and look for a shimmering, even layer of liquid wax that touches every single side of the glass. Once you see that, you can confidently extinguish it, knowing you've successfully set the candle's memory. This foundation is absolutely essential! For those new to candles in general, you can learn more about how to burn a candle properly in our detailed guide.
Nailing that full melt pool on the first go guarantees that every burn after will be even, clean, and beautiful. Think of it as the most important investment you can make in your candle's performance and lifespan. You'll get to enjoy every last bit of its soothing crackle and scent.

Let's clear up a common myth right away: you absolutely need to trim your wooden wick before every single burn. I can't stress this enough. This simple step is the most important part of routine wooden wick candle care. It directly impacts your flame's height, safety, and how cleanly it burns.
If you skip the trim, you're just asking for a tall, smoky flame that will eventually leave ugly black soot marks all over your beautiful jar. No one wants that.
The magic number for your wick height is somewhere between 1/8 and 1/4 inch above the wax. This is the sweet spot for a steady, gorgeous flame and that signature crackling sound we all love. If the wick is too long, it acts like a straw, pulling up too much wax and creating a wild, unruly flame. Too short, and it might struggle to stay lit or get "drowned" by the melting wax.
The good news is you don't need a bunch of fancy gear to get this right. You've probably got what you need lying around the house.
No matter which tool you use, always make sure to clear away any trimmings from the wax before you light it up. Debris in the wax pool is a surefire way to ruin a perfect burn. Taking care of wooden wick candles is a growing trend for a reason—it makes a huge difference, as detailed in this piece on the rise of wooden wick candles on Accio.com.
Oops, I Trimmed It Too Short!
It happens to the best of us, so don't panic. If you get a little overzealous with your trim and the wick won't stay lit, here’s a quick fix. Light the wick and let a tiny pool of wax melt around it. Carefully blow it out, then use the corner of a paper towel to soak up some of that excess liquid wax. This will expose a bit more of the wick, giving it the room it needs to breathe and burn properly next time.
Even when you do everything right, sometimes a wooden wick can be a little temperamental. One might refuse to stay lit, or maybe the flame is dancing a little too wildly for your comfort. Don't worry, it happens to all of us. Think of this as your go-to guide for solving those common wooden wick headaches.
Instead of getting frustrated, you can quickly figure out what's wrong and apply a simple fix. It’s all about knowing a few tricks of the trade to rescue your candle and get back to enjoying that cozy ambiance and gentle crackle.
Is your wick struggling to stay lit, or does it look like it's "drowning" in wax? This is probably the most frequent issue people run into, but thankfully, it's an easy one. It usually means the wick was trimmed just a little too short, or wax from a previous burn has flooded it.
First, extinguish the flame completely. Grab a paper towel and use the corner to gently soak up the excess melted wax that's pooled around the wick's base. This gives the wick a bit more room to breathe and helps it maintain a steady, happy flame the next time you light it.
A tall, flickering flame spitting out black smoke is a dead giveaway that your wick is too long. When the wick is too high, it tries to draw up way too much fuel (the wax) too quickly. The result is an unstable, messy burn that creates soot.
The solution is simple. Put out the candle, let the wax cool all the way down, and then trim that wick to its sweet spot: about 1/8 of an inch. This tiny adjustment is the key to a clean, safe, and beautiful flame.
A short wick is truly the secret to a clean burn with wooden wicks. A flame that's too big not only makes a sooty mess but also burns through your candle way faster, which is just a waste of good wax and fragrance.
This chart shows exactly how much of a difference wick length and burn time make when it comes to soot.
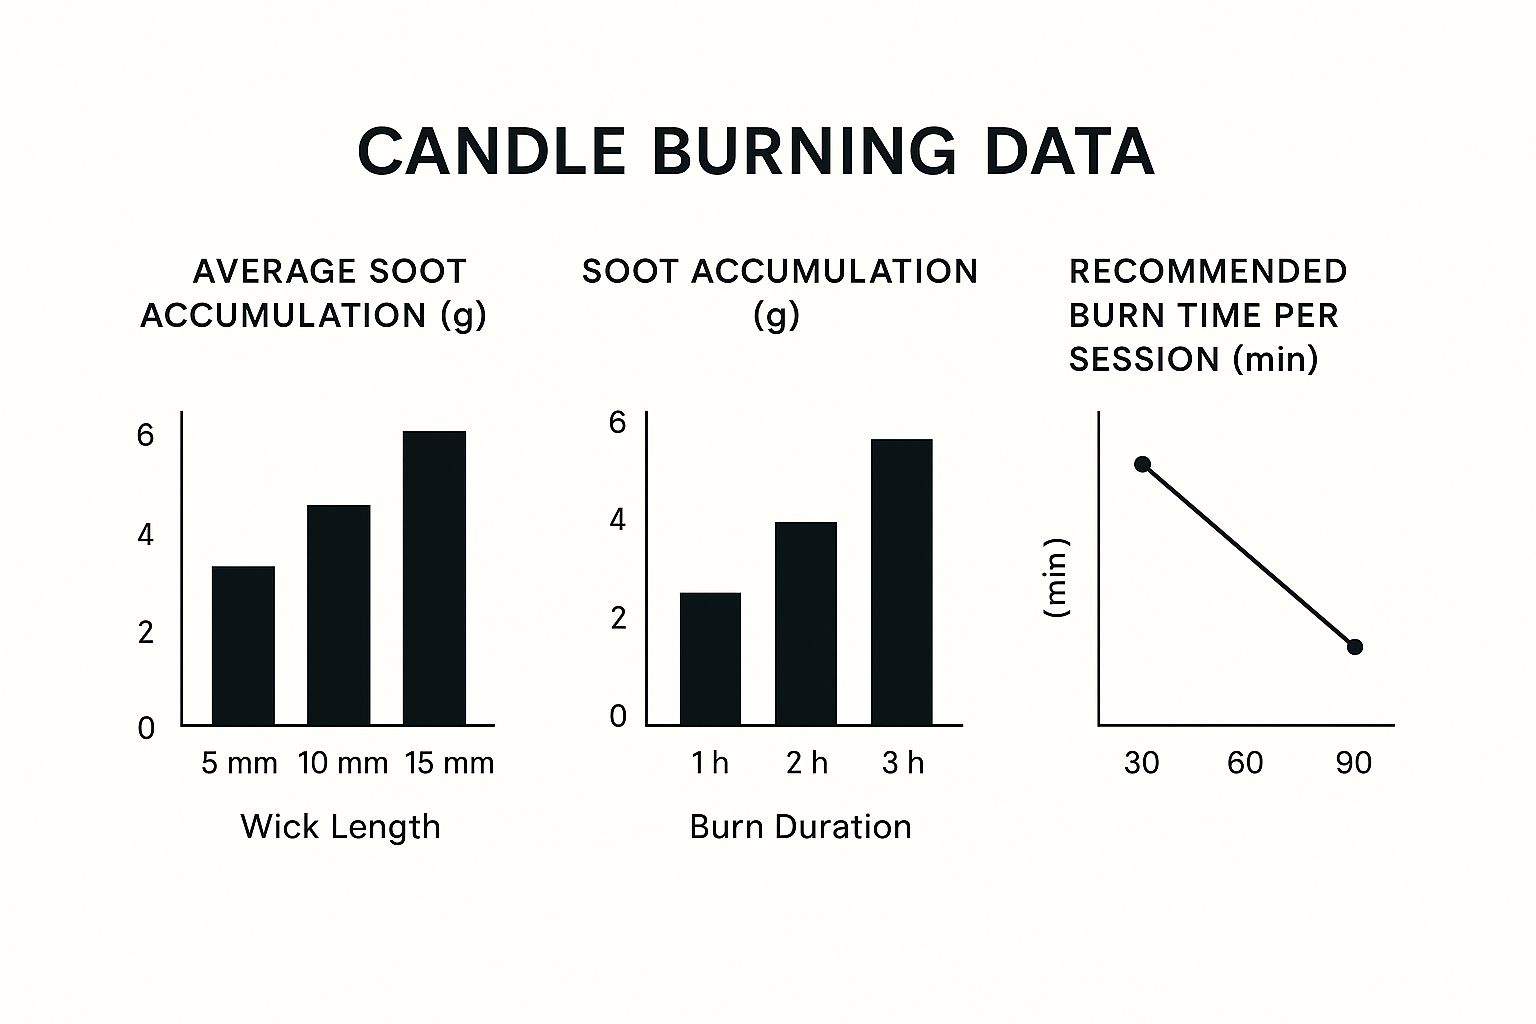
As you can see, keeping those wicks short and burn times reasonable is your best bet for a cleaner experience.
Sometimes, even with a perfect first burn, a "tunnel" still forms. This is when only the wax in the center melts, leaving a stubborn ring of hard wax stuck to the sides of the jar. It's a frustrating sight, but not a lost cause!
You can easily fix this with the "foil method." Just wrap a piece of aluminum foil around the top of the jar, creating a dome but leaving a small opening over the flame. This little trick traps the heat and helps melt that stubborn wax ring, leveling out the surface like magic. For a more detailed guide, check out our post on how to fix candle tunneling. It's a simple trick that can save a candle you thought was a goner.
Sometimes you just need a quick reference. Here's a handy chart to help you diagnose and solve any wooden wick woes that pop up.
| Problem | Likely Cause | Solution |
|---|---|---|
| Wick won't stay lit | Wick is too short or "drowning" in wax. | Extinguish the flame. Use a paper towel to soak up excess wax around the wick. |
| Flame is too high/smoky | Wick is too long. | Extinguish and cool the candle. Trim the wick to 1/8 inch. |
| Candle is tunneling | Didn't achieve a full melt pool on the first burn. | Use the "foil method" to trap heat and melt the excess wax on the sides. |
| Crackling is too loud/soft | Wick needs trimming or there's debris in the wax. | Extinguish, cool, and trim the wick. Gently remove any black char from the wax pool. |
With these tips in your back pocket, you'll be able to keep your wooden wick candles burning beautifully from the first light to the very last flicker.

How you end your candle’s burn session is just as important as how you start it. I know the first instinct is to just blow it out, but that can actually do more harm than good. It often creates a puff of smoke and can send little black bits of soot right into that gorgeous pool of melted wax. Nobody wants that.
Proper wooden wick candle care means paying attention to this final step, too.
A much cleaner way to go is using a candle snuffer. This little tool is designed to gently cut off the flame's oxygen supply, putting it out instantly without any messy smoke. It keeps the air clear and your liquid wax looking pristine for its next burn.
Another great trick, and honestly the one I use most often, is the candle's own lid. Just pop the lid back on the jar. It’ll smother the flame safely and trap any smoke inside, which helps preserve the room's lovely fragrance. Super easy and convenient.
Once your candle has completely cooled down, don't just leave it sitting out on the counter. Taking a moment to store it correctly is key to protecting your investment and making sure it’s perfect for the next time you light it. Always, always put the lid back on before you put it away.
This one simple action does two really important things:
Your candle's happy place is somewhere cool and dark, away from direct sunlight or big temperature swings. Think of a linen closet, a cabinet, or a drawer—they're all perfect spots. Heat can make the wax and oils "sweat," which changes the candle's texture and scent. Following these simple habits for extinguishing and storing will keep your candle looking and smelling amazing for its entire life.
We’ve walked through the basics of trimming and burning, but I know there are always a few little questions that pop up along the way. This is where we get into those "what if" moments that can leave you scratching your head.
Think of this as your go-to guide for becoming a true wooden wick pro.
That signature crackle is a huge part of the whole experience, so it’s totally understandable to be confused when it suddenly changes. The sound is a direct result of the wood type, its thickness, and how much wax and fragrance oil it’s soaked up.
If you’re hearing a loud, sputtering crackle, it’s a tell-tale sign the flame is way too big and burning too hot. Nine times out of ten, this means the wick is simply too long. Trimming it back down to that sweet spot of 1/8-inch will calm everything down and bring back that gentle, soothing sound.
On the flip side, a silent wick is basically a cry for help. It usually means one of two things is happening:
A steady, gentle crackle is the sound of a happy, well-cared-for wooden wick. If the sound changes dramatically, your candle is just letting you know it needs a quick trim or a little less wax.
Absolutely! Reusing your candle jar is a great, sustainable way to give it a second act. Most of our jars are perfect for this and can be turned into stylish containers for all kinds of things.
You’ll want to stop burning your candle when there’s about a half-inch of wax left in the bottom. To get it clean, just pop the jar into your freezer for a few hours. The cold makes the wax shrink and harden, so it and the metal wick clip should pop right out.
After that, a quick wash with some hot, soapy water will get rid of any residue. You'll be left with a beautiful container that's perfect for holding pens on your desk, planting a tiny succulent, or organizing your makeup brushes.
Yep, a tiny puff of smoke right when you light your candle is completely normal. That’s just the flame getting started and finding its footing. That smoke should disappear almost instantly, though.
If your candle keeps putting out a steady stream of smoke while it’s burning, that's a clear signal something isn't right. The culprit is almost always a wick that's too long. A properly trimmed wick burns cleanly and should have almost no visible smoke.
If you notice your candle is continuously smoking, just extinguish the flame, let it cool down completely, and give that wick a good trim.
Ready to experience that perfect crackle for yourself? Discover your next favorite scent with Jackpot Candles, where every candle comes with a surprise jewelry reveal inside. Explore our full collection of hand-poured wooden wick candles at https://www.jackpotcandles.com.
Comments will be approved before showing up.