

Lighting a candle seems simple enough, but there is a genuine art and science to achieving a perfect, even burn. The difference between a beautifully fragrant experience and a smoky, tunneling mess often lies in a few key practices that many people overlook. Whether you are enjoying a luxurious candle with a hidden jewelry surprise or a simple decorative pillar, understanding the fundamentals of candle care completely transforms the experience. Proper technique is essential for getting the most value and the longest life from every candle you own.
These expert candle burning tips are designed to help you master the flame. Following these best practices will not only guarantee a safer and cleaner burn but also a more fragrant ambiance in your home. By learning to prevent common issues like wasted wax, weak scent throw, and uneven surfaces, you can elevate your entire routine from basic to brilliant. This guide provides actionable steps to ensure every candle burns perfectly, maximizing its potential and, for reveal candles, setting the stage for that exciting jewelry discovery. Get ready to make every single burn flawless.
If you only adopt one new habit from this list of candle burning tips, make it this one. Before every single burn, you must trim your wick to approximately 1/4 inch (or about 6mm). This small, simple action is the single most important step for ensuring a safe, clean, and long-lasting candle experience. An untrimmed wick is too long, which creates a large, unstable flame. This leads to excess soot, black smoke, and dark marks on your candle jar, ultimately diminishing both the look and performance of your candle.
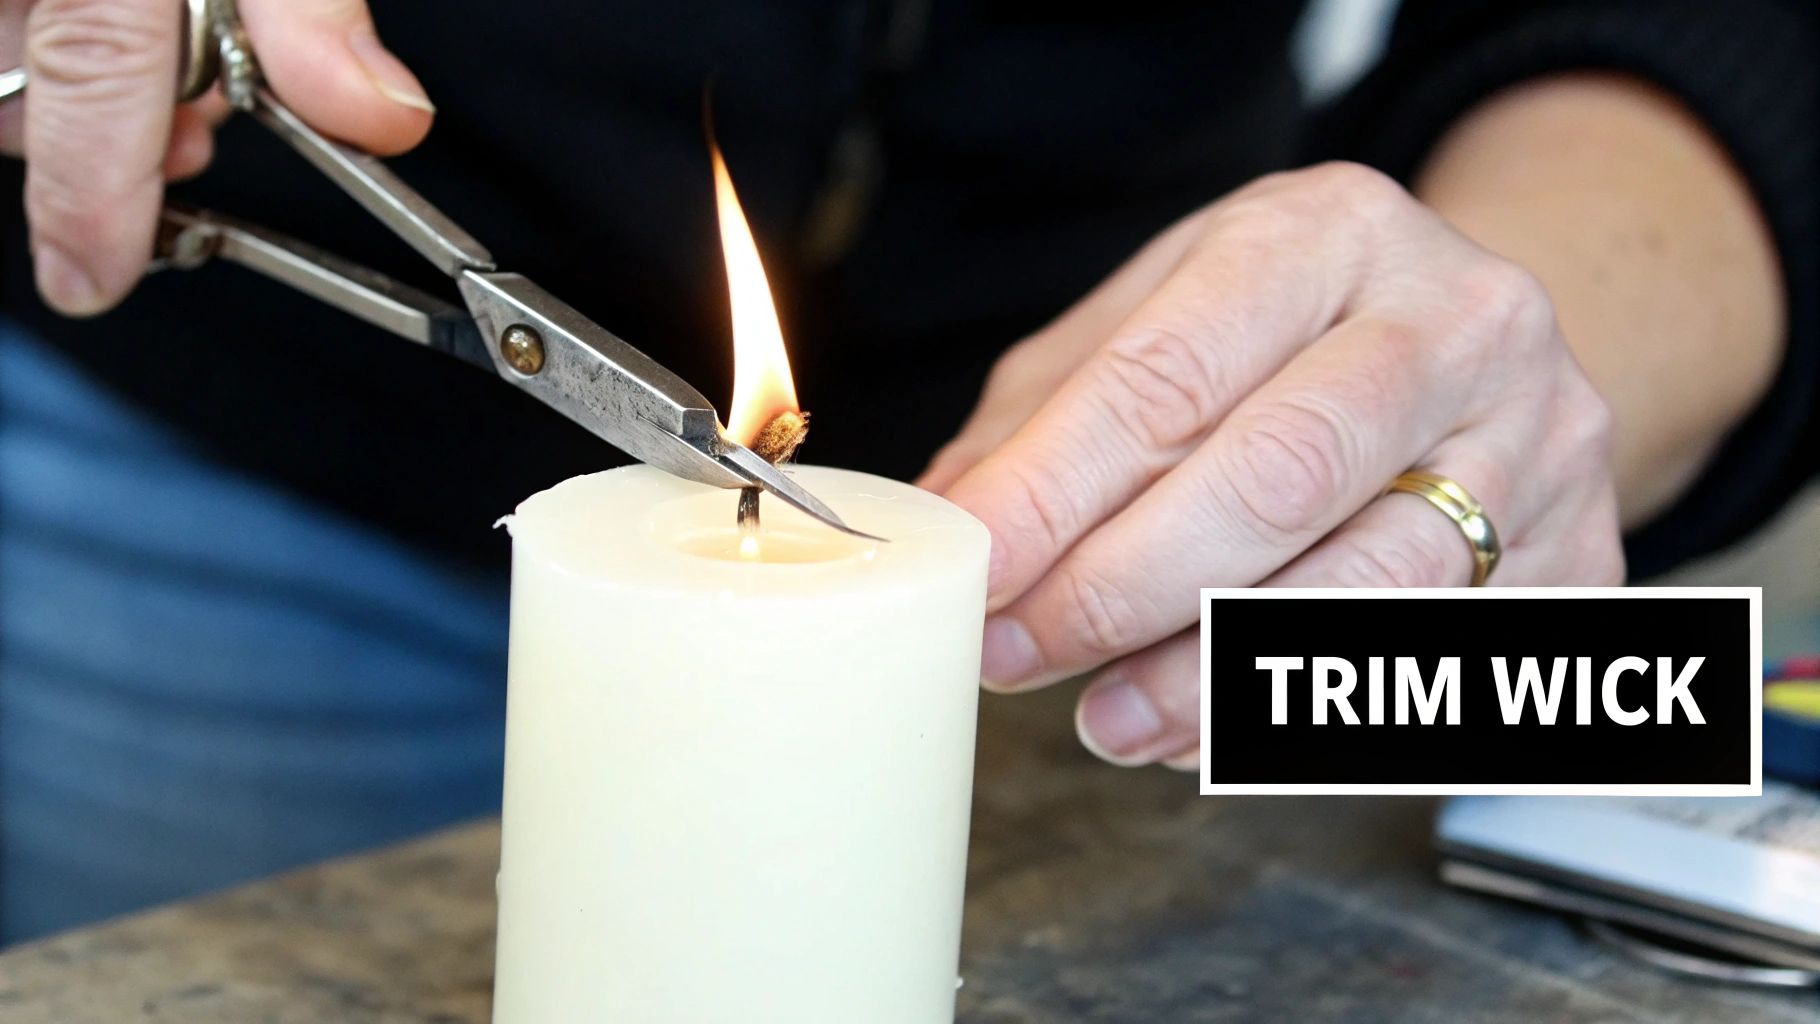
A properly trimmed wick maintains a controlled, teardrop-shaped flame. This smaller flame melts the wax more slowly and evenly, which maximizes your candle's lifespan and promotes a powerful fragrance throw. Think of it like a carefully managed campfire versus an out-of-control blaze. The controlled fire provides consistent heat and light without becoming dangerous or wasteful. This principle is why professional candle makers and luxury home fragrance brands, from Jo Malone to Diptyque, emphasize this rule in all their candle care instructions.
The science is simple: a shorter wick draws up less fuel (melted wax) at a time. This results in a cleaner combustion process that minimizes soot and mushrooming, which is the buildup of carbon on the wick's tip. You should trim the wick every time before you light your candle. Make it a non-negotiable part of your ritual.
Adopting this practice is a fundamental aspect of proper candle maintenance. To explore more about this crucial step, you can review this in-depth guide to properly caring for your candles on JackpotCandles.com.
If wick trimming is the most frequent habit, the first burn is the most critical event in your candle's life. The initial burn sets the "memory" for all subsequent burns. You must allow the candle to burn long enough for the wax to melt completely across the entire surface, creating a full melt pool that reaches the very edges of the container. Ignoring this rule is the primary cause of "tunneling," where the wick burns straight down the center, leaving a thick wall of unused wax around the sides. This wastes wax, reduces your candle's lifespan, and significantly weakens its fragrance throw.
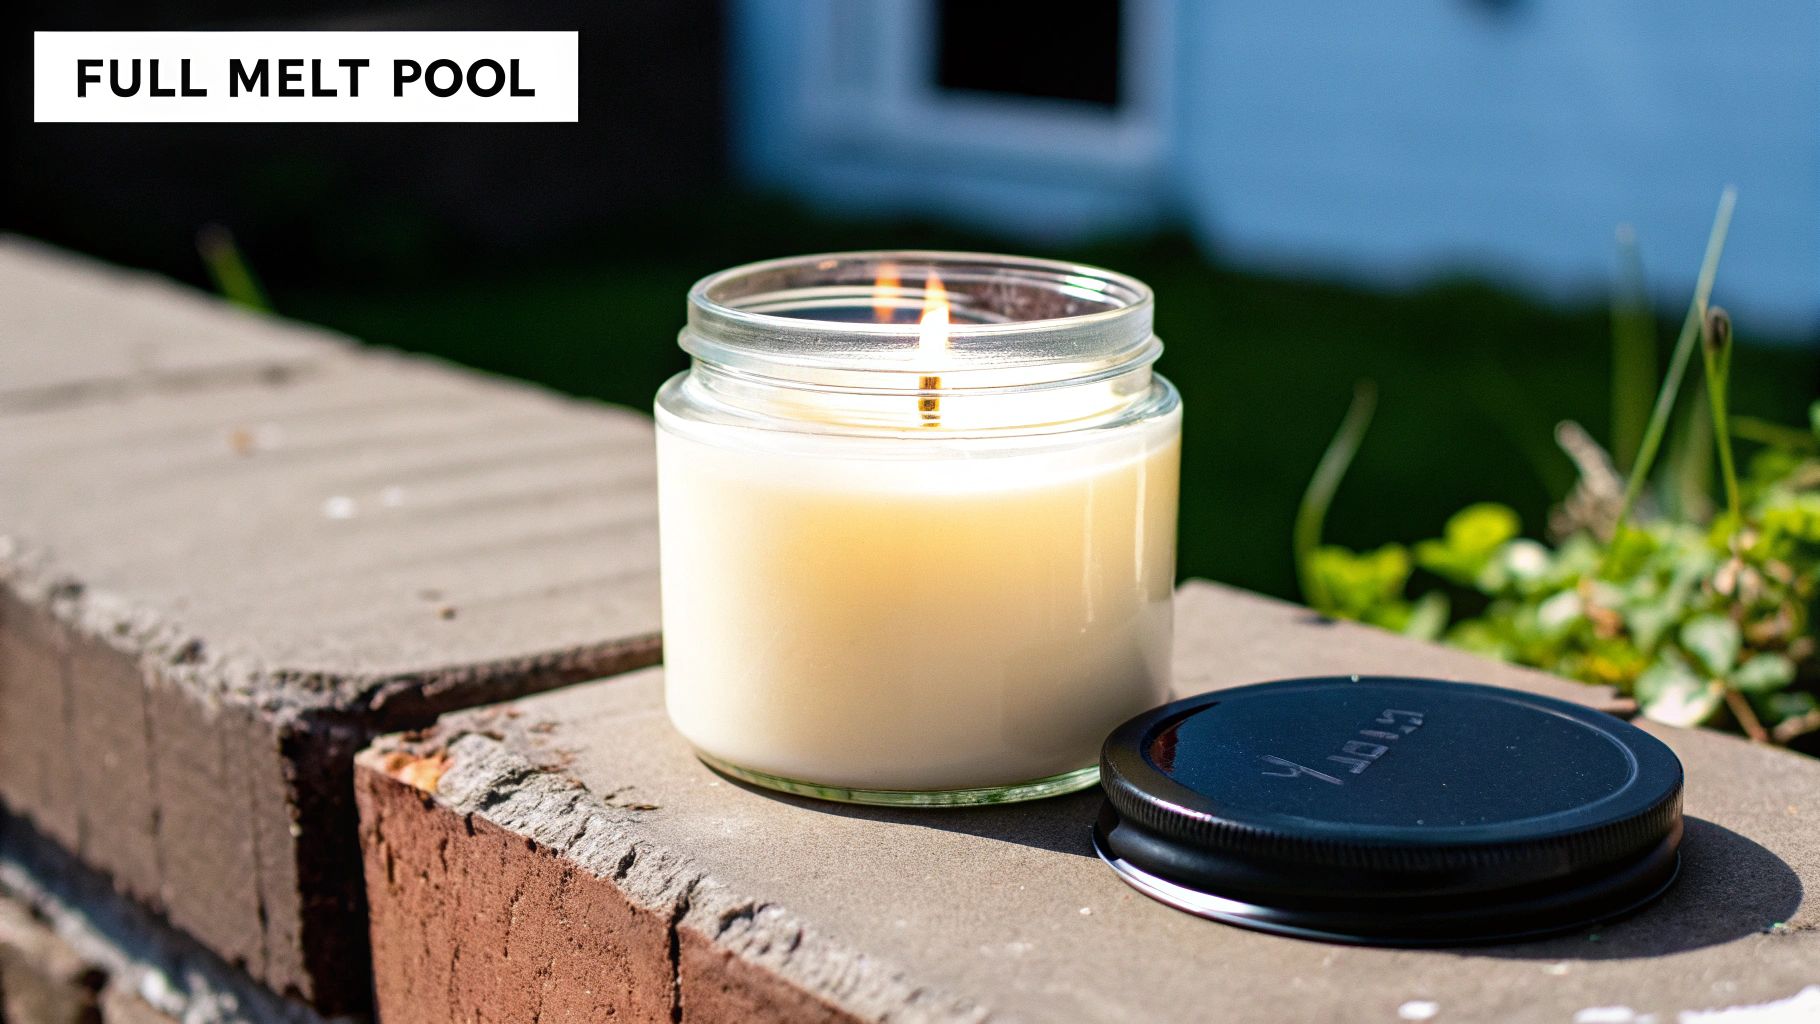
Think of it as training your candle. By allowing it to form a complete, edge-to-edge melt pool on the first go, you are programming it to burn evenly every time thereafter. This ensures you get the maximum value and enjoyment from your purchase. Esteemed brands like Yankee Candle and Anthropologie often include specific instructions emphasizing this step, especially for their larger or wider candles where achieving a full melt pool is paramount. Professional spas also adhere strictly to this protocol to maintain a consistent, luxurious ambiance without the unsightly look of a tunneled candle.
Candle wax has a memory. The radius of the first melt pool determines the maximum melt pool for every future burn. If you extinguish the flame before the wax melts to the container's edge, it will only ever melt to that smaller diameter on subsequent burns, creating a frustrating and wasteful tunnel. You should follow this rule only on the very first burn. The general guideline is to allow one hour of burn time for every inch of the candle's diameter. For a typical 3-inch wide candle, this means a 3-hour initial burn.
Mastering this one-time step is one of the most effective candle burning tips for extending candle life and maximizing its performance. You can discover more about this and how to rescue a poorly burned candle in this guide about how to prevent and fix candle tunneling on JackpotCandles.com.
While it’s tempting to let a beautiful candle burn indefinitely, one of the most critical candle burning tips for safety and performance is to limit each session to a maximum of four hours. Burning a candle for too long can cause the container, especially glass jars, to overheat to dangerous temperatures. This excessive heat can lead to a cracked vessel, a dangerously large flame, and a significant fire hazard. It's a non-negotiable rule advocated by experts for preserving both your candle and your home.
This four-hour rule is not just about longevity; it's a fundamental safety precaution. When a candle burns for an extended period, the entire vessel becomes superheated, and the wick can begin to "mushroom," creating an unstable, oversized flame that produces soot and smoke. This is why organizations like the National Fire Protection Association (NFPA) and premium candle brands alike universally recommend this time limit. Adhering to this guideline ensures the candle's structural integrity remains intact and the burn stays clean and controlled from start to finish.
The four-hour burn limit prevents the wax from becoming too hot, which can cause it to burn off too quickly and compromise the fragrance oils. It also prevents the wick from becoming unmanageable and the container from reaching a point where it could fracture or combust. You should enforce this rule every time you burn any container candle. Think of it as a built-in safety feature. After four hours, extinguish the flame, allow the candle to cool completely for at least two hours, trim the wick, and then you can safely relight it.
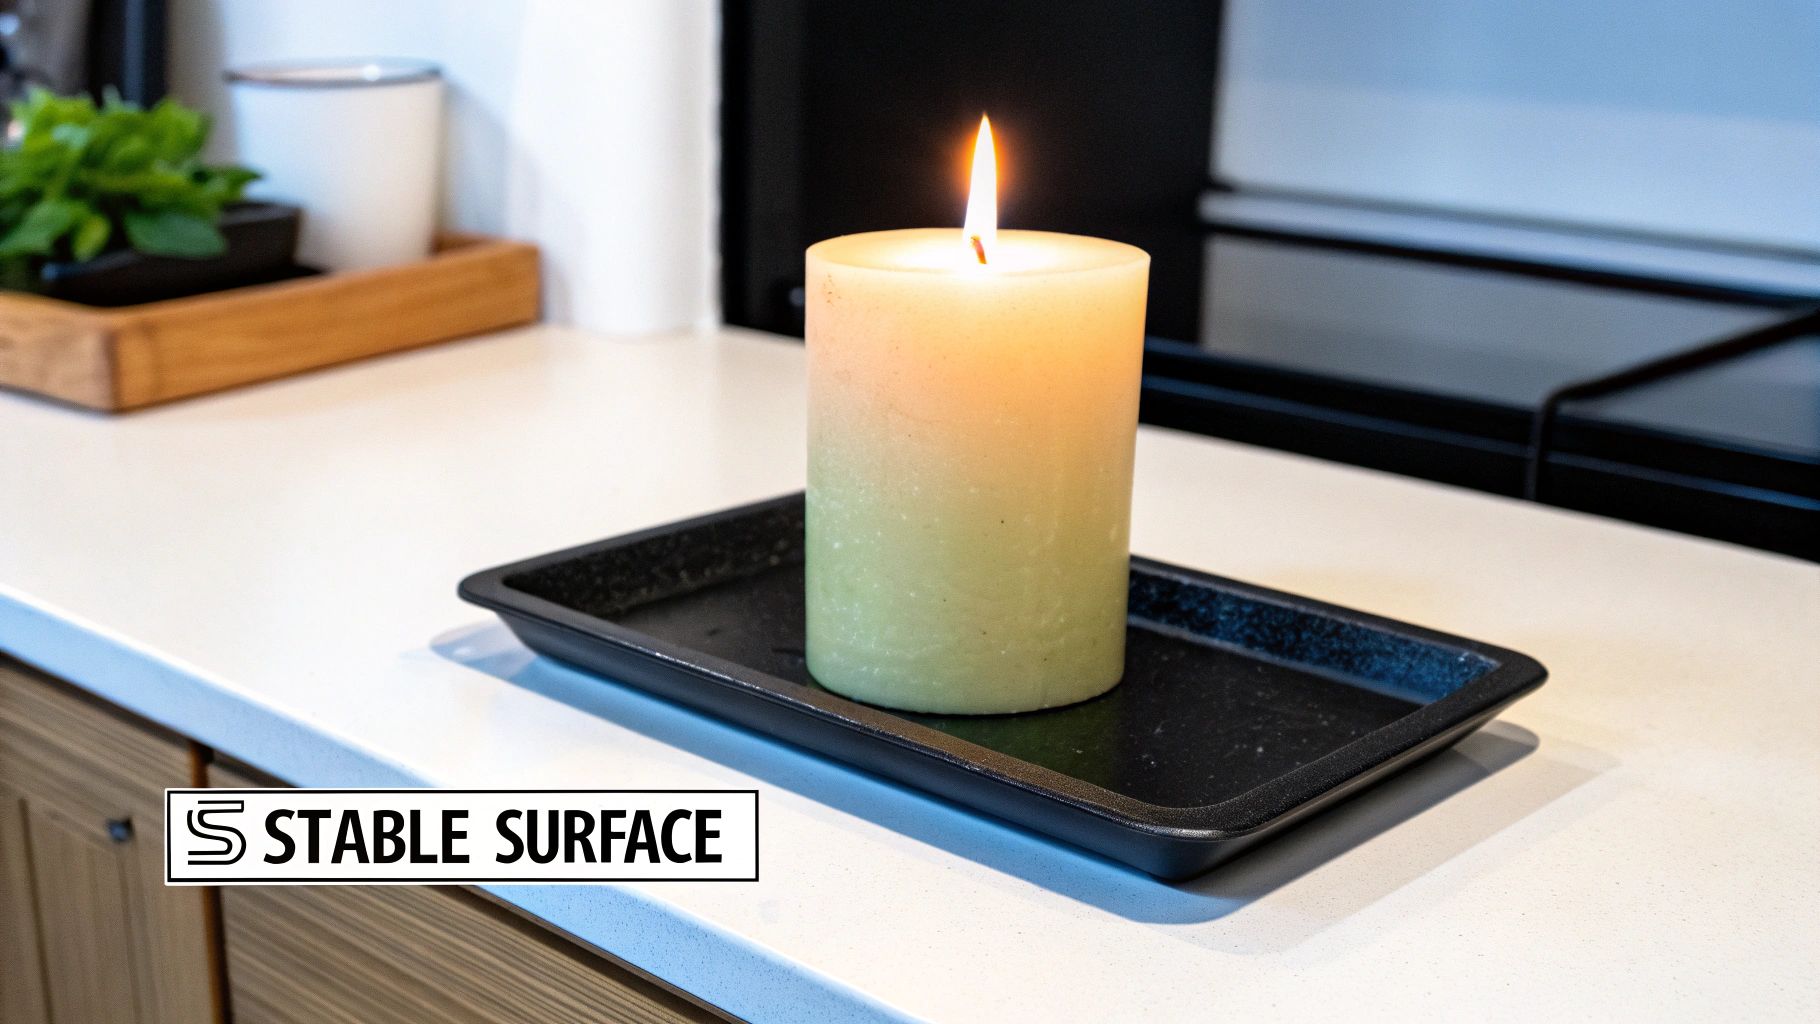
While the flame itself is beautiful, the heat it generates can be surprisingly intense. Proper candle placement is a non-negotiable aspect of home safety and optimal performance. Neglecting this crucial step can lead to damaged furniture, fire hazards, or a ruined candle. A candle should always be placed on a surface that is completely stable, level, and specifically designed to withstand heat, keeping it safely away from flammable materials, drafts, and high-traffic areas. This foundational safety measure ensures your candle burning experience remains a relaxing pleasure, not a potential emergency.
The base of a candle jar can become extremely hot, especially during long burn sessions. This heat can easily scorch, melt, or permanently stain unprotected surfaces like wood, plastic, or painted finishes. Think of the meticulous practices in high-end settings: luxury hotels often place candles only on stone mantels or ceramic trays, and fine dining restaurants use dedicated heat-resistant plates for their table candles. This principle is heavily promoted by fire safety organizations and home insurance companies for a reason, as it dramatically reduces the risk of accidental fires and property damage.
The logic is rooted in basic fire prevention. A heat-resistant surface acts as a protective barrier, absorbing and dissipating the heat transferred from the candle vessel. A stable, level surface prevents the candle from tipping over, which could spill hot wax and spread the flame. You should implement this practice every single time you light any candle, without exception. Whether it's a tiny tea light or a large three-wick jar, its placement is paramount for safety.
Making safe surface selection a mandatory part of your candle burning tips and rituals is essential. For more information on fire-safe practices, the National Fire Protection Association (NFPA) offers comprehensive candle safety guidelines.
Placing your candle in a stable, draft-free environment is just as crucial as trimming the wick for achieving a perfect burn. A draft from an open window, a ceiling fan, or an HVAC vent might seem harmless, but it constantly disrupts the candle's flame. This disturbance causes the flame to flicker wildly, which leads to an uneven melt, unsightly black soot on the jar, and a significantly weaker fragrance throw. A dancing flame is an inefficient flame, burning through wax more quickly on one side and increasing the risk of tunneling.
Protecting your candle from air currents ensures the flame remains steady, calm, and centered. This stable flame provides consistent, gentle heat that melts the wax pool evenly across the entire surface. Think of the controlled environment in a luxury spa or a fine dining restaurant; candles are deliberately placed in protected alcoves or on sturdy tables away from doorways and vents. This strategic placement is a key element of professional candle burning tips, designed to maximize safety, aesthetics, and performance, ensuring the candle burns cleanly and releases its full aromatic potential.
A steady flame burns more efficiently and at a lower temperature than a flickering one, which is constantly being fed excess oxygen by the moving air. This stable combustion process prevents the flame from getting too large or too hot, which is what causes soot and rapid, uneven consumption of wax. You should assess the location for drafts every time you decide where to light your candle. A spot that was calm in the morning might be in the direct path of an air conditioning vent that kicks on in the afternoon.
By being mindful of air currents, you take control of the burning environment. This simple act of strategic placement is a cornerstone of advanced candle care, helping you avoid common problems and get the most out of every burn. You can learn more about creating the ideal candle environment from fire safety resources like the National Fire Protection Association's candle safety page.
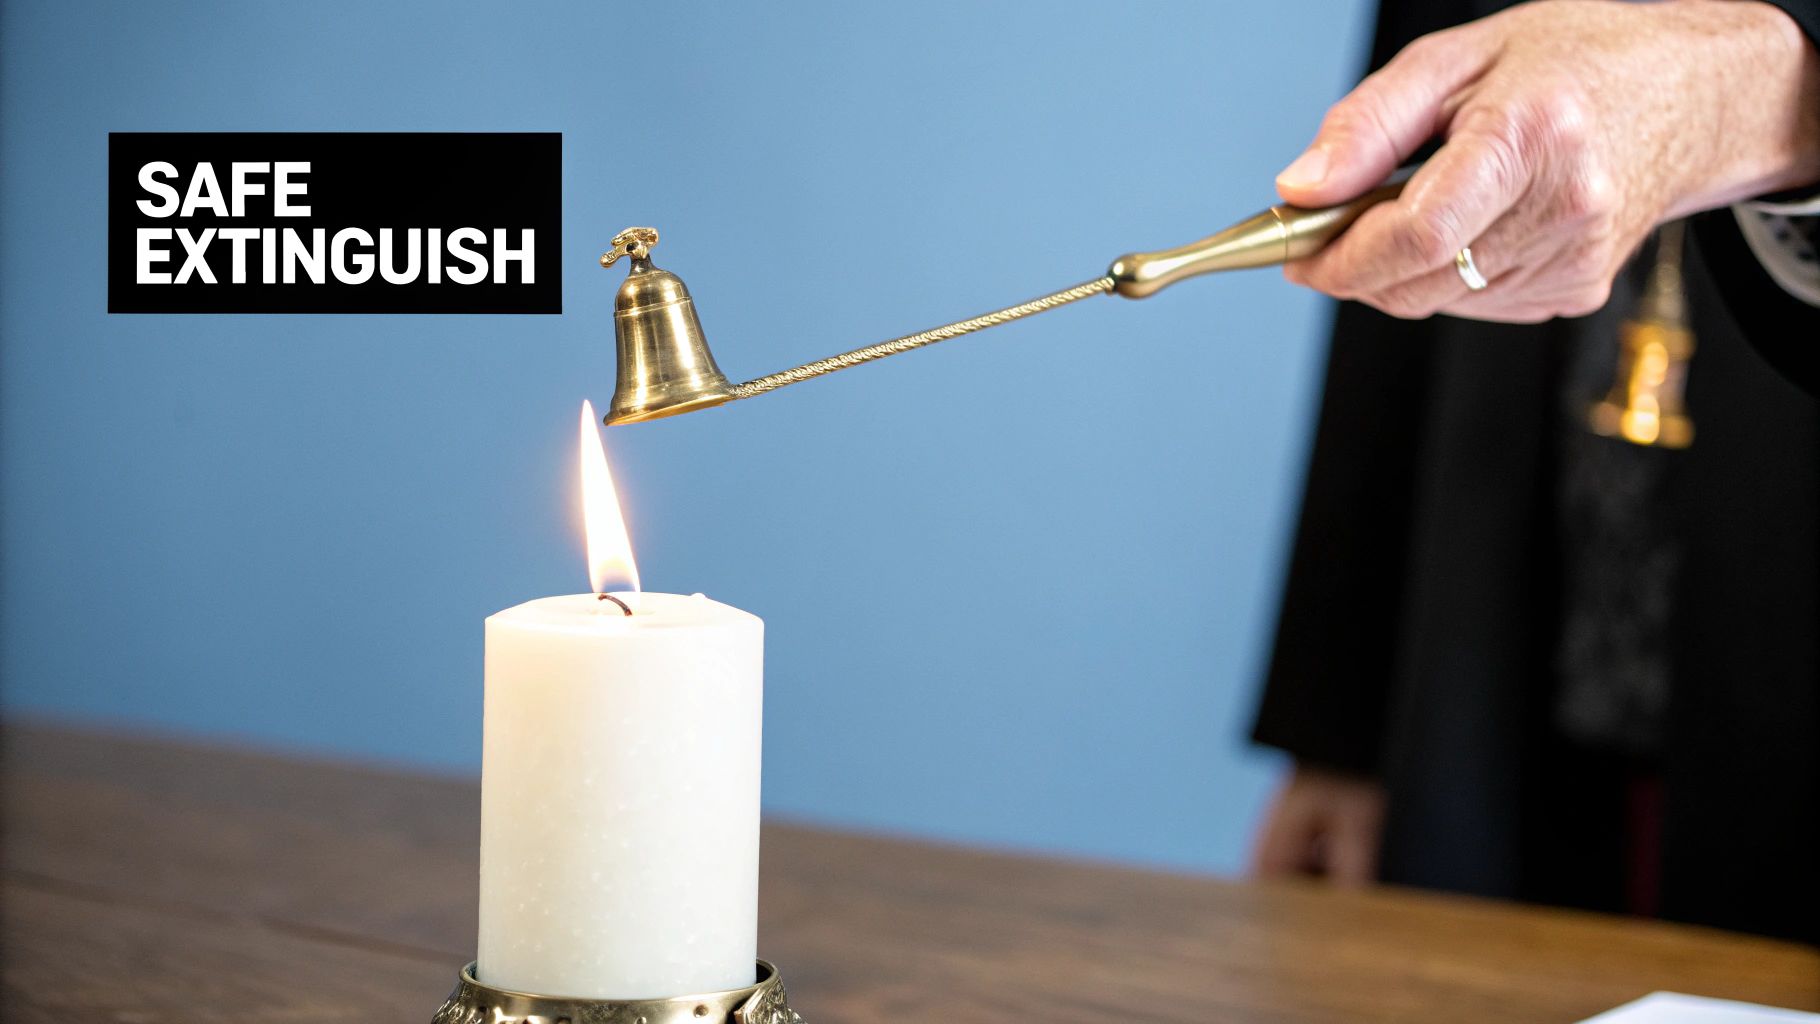
How you extinguish your candle is just as important as how you light it. The common habit of blowing out a flame can undermine all your other candle care efforts. This forceful method creates excess smoke, splatters hot wax onto your jar and surfaces, and can even bury the wick in melted wax, making it difficult to relight. To preserve your candle's integrity and ensure a clean experience next time, adopting a professional extinguishing method is one of the best candle burning tips you can follow.
Using a dedicated tool like a wick dipper or a candle snuffer eliminates smoke and protects the wick. A wick dipper is a long, thin metal rod with a hook or bend at the end, used to push the lit wick into the molten wax pool and then pull it back out. A snuffer is a small bell-shaped cup on a long handle that you place over the flame, starving it of oxygen. Luxury brands like Diptyque and Byredo often promote these tools, and they are standard practice in high-end hospitality settings for a reason: they are safer, cleaner, and more elegant.
Blowing out a candle leaves a smoldering wick that releases a plume of unpleasant, sooty smoke, which can linger in the air and interfere with the beautiful fragrance you just enjoyed. A wick dipper instantly coats the wick in wax, which not only extinguishes the flame smokelessly but also primes the wick with wax for an easier, cleaner light next time. A snuffer contains the smoke within its bell, preventing it from filling the room. You should use one of these methods every single time you extinguish your candle to maintain its quality and the ambiance of your space.
Mastering this technique is a hallmark of a true candle enthusiast. To discover more expert advice, you can explore this guide on the best way to put out your candles on JackpotCandles.com.
| Candle Care Practice | Implementation Complexity 🔄 | Resource Requirements ⚡ | Expected Outcomes 📊 | Ideal Use Cases 💡 | Key Advantages ⭐ |
|---|---|---|---|---|---|
| Trim Your Wick to 1/4 Inch Before Each Use | Low – needs regular attention and tools | Wick trimmer or scissors | Controlled flame, less soot, longer candle life | Everyday candle maintenance | Extends lifespan, reduces smoke, prevents damage |
| Follow the First Burn Rule (Burn Until Full Melt Pool) | Medium – requires uninterrupted 1-4 hr burn | Time commitment for initial use | Even burning, prevents tunneling, full fragrance throw | New candles, ensuring burn quality | Maximizes burn time & scent, prevents wax waste |
| Never Burn for More Than 4 Hours at a Time | Low – requires time tracking | Timer/device for monitoring burn duration | Prevents overheating, reduces fire risk, wick health | Long burning sessions, safety-conscious users | Fire safety, prevents glass cracking, fragrance preservation |
| Always Burn Candles on Heat-Resistant, Stable Surfaces | Low – requires appropriate surface setup | Heat-resistant surface or holder | Stability, fire prevention, surface protection | Any candle use, especially in homes & hospitality | Reduces fire risk, prevents damage, safe ambiance |
| Keep Candles Away from Drafts and Air Currents | Low – requires proper placement | Awareness of air flow, possible glass covers | Steady flame, even wax melt, less smoke | Drafty rooms, event settings, spas | Safety improvement, consistent fragrance, less mess |
| Extinguish Candles Properly Using a Wick Dipper or Snuffer | Medium – needs tools and proper technique | Wick dipper, candle snuffer | No smoke, prevents wick damage, less soot and splatter | Premium candle care, hospitality, refined usage | Cleaner extinguishing, wick longevity, fragrance quality |
Mastering the art of candle care transforms a simple pleasure into a truly luxurious and intentional experience. It's the difference between merely lighting a candle and curating a specific ambiance. The six fundamental candle burning tips we have explored are not just arbitrary rules; they are the pillars of performance, safety, and longevity for every candle in your collection. By moving beyond basic fire safety and embracing these nuanced techniques, you gain complete control over your home fragrance journey.
Recapping our key insights, the journey begins before you even strike a match. Trimming the wick to a precise 1/4 inch is your first, most impactful action. This single step prevents soot, controls flame height, and ensures a clean, even burn from the very start. Following this with a disciplined first burn, allowing the wax to melt completely to the edges, sets the stage for a tunnel-free life. This initial investment of time pays dividends, preventing wasted wax and ensuring you enjoy every last drop of fragrance.
The ongoing care you provide is just as crucial. Adhering to the four-hour burn limit protects the integrity of the wax and wick, while choosing a stable, heat-resistant surface is non-negotiable for safety. Likewise, being mindful of drafts from fans, vents, or open windows directly impacts the candle's ability to burn evenly and release its fragrance effectively. Finally, how you extinguish the flame matters immensely. Using a snuffer or a wick dipper eliminates smoke and protects the wick for its next use, providing a clean end to your session.
These practices, when combined, create a powerful synergy. You will notice a stronger, more consistent fragrance throw, a significantly longer burn time, and a cleaner container. These are not just abstract benefits; they translate to tangible value, making your candle investment go further while enhancing the safety and beauty of your home. Applying these expert candle burning tips elevates your role from a passive user to an active curator of your sensory environment.
For enthusiasts of our unique jewelry reveal candles, these techniques are doubly important. A perfectly even, well-maintained burn is the most reliable path to successfully and cleanly revealing your hidden treasure. An uneven melt pool or a tunneled candle can make retrieving your surprise difficult. By mastering these methods, you ensure the candle burns down smoothly, presenting your jewelry jackpot exactly as intended for a truly magical and satisfying discovery.
Ready to put your newfound skills to the test with a candle that offers more than just a beautiful scent? Explore our collection at Jackpot Candles and discover the thrill of a brilliant fragrance followed by a stunning jewelry surprise. Choose your favorite scent and see how applying these tips can lead to the perfect burn and an even better reveal.
Comments will be approved before showing up.